Showing posts with label basically bare. Show all posts

Monday, December 17, 2012

Rustic Christmas Tree Ornament

Just one more week until the big day is here!  Are you ready?  

Today I have a fun tutorial to share that uses products from two of my favorite companies - Kuretake (who makes the wonderful Zig line of pens) and Basically Bare (who makes tons of amazing embellies and mixed media albums).

So let's get started on this cute little ornament.


Step One: Paint a chipboard pennant with your green Zig Painty FX pen.


Step Two: Next cut a piece of burlap just large enough to fit over the pennant and select three markers in different shades of green.


Step Three: On a craft sheet, scribble the markers.


Step Four: Spritz the ink with three to four sprays of water.


Step Five: Run the burlap through the ink puddle until covered. Set aside to dry or you can speed up drying by using your heat tool.


Step Six: Adhere the burlap to the pennant and trim the edges.


Step Seven: Cover a corrugated brick with a brown Art & Graphic Twin marker.


Step Eight: Cover an acrylic star with gold ink using a Zig Fabricolor pen.


Step Nine: Wrap the pennant with a piece of red ornament trim.  Lastly, attach the star and tree trunk to the pennant using jump rings and add a tree hook to the top of the star.


Kuretake items used:
-Painty FX marker in green
-Art and Graphic Twin marker #72, #5, and May Green
-Zig Fabricolor marker in Gold and Light Green

Basically Bare items used:
-Celestial Shapes Set
-Climbing Ivy Set
-Pennants (large) set

Other items used:
-burlap
-metal ball trim
-jump rings

Monday, November 26, 2012

Beginnings

Now that we're heading into the cooler months, how about a quick reminder of Summer?  

This layout is chock full of Basically Bare goodness - the sun and clouds from the Celestial Set, a two canvas hearts, and an acrylic frame.

The clouds were covered with Stickles for lots of shimmer.  The sun was inked yellow, then heat embossed with three layers of UTEE.  Then I placed it in the freezer for about 15 minutes.  Once I took it out of the freezer, I bent it in several places until the UTEE cracked.  Then I inked over the cracks with Distress Ink.  This creates a really fun look.

I ran the frame through my Cuttlebug for a bit of texture.  Lastly, I used a Crafter's Workshop stencil and Tattered Angels mists with the canvas hearts.  Again, lots of shimmer.


These pictures are of my niece on her first trip to the beach in August.  She went from screaming and being scared of the water to playing and laughing in the span of just a few seconds.  I'm already anxiously waiting for warmer weather so we can head back to the beach.

Monday, November 19, 2012

Hugs and Kisses and ...

In celebration of Queen Kat Designs 6th birthday, we're having a blog hop!  

So you don't miss anyone along the way, here is the full list of the blog participants.
Jamie (that's me!)

Today I have an adorable wall hanging that uses the Beautiful Dancer Fairy stamp by stamp artist Amy Brown.  I absolutely love this fairy!


To start, I used a Basically Bare Scalloped Oh So Mini Album chipboard page and covered it with patterned paper.  Then, using a Crafter's Workshop template, I cut out a lighter piece of patterned paper and adhered it to the album page.


Then I stamped, colored my fairy with Prismacolor pencils, and then fussy cut her out.


Lastly, I added a chipboard flourish, which was painted with a Zig Woodcraft marker, a few Prima flowers, and a couple of mirror embellishments.

Thanks for stopping in today.  Now, off you go to Vikki's blog to see the next creation on the blog hop!

Supplies:
Basically Bare Scalloped Oh So Mini Album
Zig Woodcraft marker in Antique
May Arts ribbon

Monday, November 12, 2012

Christmas Canvas

Have you started working on all those Christmas projects and gifts that you'll be making this year?  Scary to think, but the big day is only six weeks away. Here's a fun canvas idea to get you in the mood.  


I started with a 5x7 canvas some old paperback books I had laying around.  I tore the book pages into roughly two inch squares and adhered them as a collage onto the canvas with gel medium.

Once the gel medium is completely dry, it's time to start adding some color.  For this, I started by making a small puddle of water on my craft sheet. Then using a Zig Writer in Pure Red, I scribbled a bit of ink onto the canvas.   Next, I quickly dipped my finger into the water and then used my wet finger to spread the ink across the canvas.  My fingers really are the best tools I have in my scraproom. :)


I continued to add scribbles of ink and blending it with water until the canvas is fully covered.  Don't forget to add ink to the sides of the canvas too.


I wanted to add a small bit of distress to the canvas and also tone the bright red just a tad.  So, to do this, I used a Zig Woodcraft marker in Antique Metallic.  I held the marked down until I had a small puddle of ink on my craft sheet and then also made another small puddle of water.


Then, I simply dipped my finger into the water puddle and then into the ink and randomly spread the mixture on the canvas.


 For the next step, I used a Zig Writer in Pure Brown to create a tree branch.  You can do this freehand, or if you're like me, you can use a stencil.


Now, on to the embellishments.  I used a Basically Bare Holiday Ornament in bare chipboard and felt.  To start, I painted the chipboard white using a Zig Painty FX marker in White.


Once the paint was dry, I added a layer of Glass Bead gel medium.  This medium added such a wonderful texture!  This part takes about 24 hours to dry, so please keep this in mind when using the glass bead medium.


Next, I painted the felt piece of the ornament using a Zig Painty FX marker in Green.  Once the paint was dry, I also added a layer of Green Stickles to the felt piece. I am a glitter girl, and every project must have a bit of glimmer and shine.


Now, it's time to tie everything together.  I added a piece of trim around the outside border of the canvas.  Then I added a piece of May Arts twine to use as a hanger on the ornament.  A bit of ribbon and a jingle bell finishes the ornament.  Lastly, I added a sentiment.


Now wish me luck, I have 12 more of these canvases to make.

Monday, November 5, 2012

Cards Galore

Did I mention that I have several cards to show today!  Each of these were featured in Scrapbook News and Review Magazine and several feature Basically Bare products.

First up is a super quick card that would be perfect for that special someone.  A bit of punchinella in the background, a Basically Bare heart, and lots of glitter embossing powder.


Next up is a card that uses nothing but scraps of patterned paper.  For me cards, are the perfect way to use up those bit and pieces left over after finishing a layout.


This card is by far my favorite of the bunch.  I took a piece of watercolor paper and layered on the liquid watercolors until I was happy with the look.  Then I simply added a pre-printed transparency with the sentiment and silhouette.  Quick and simple but with lots of color.


For this next card, I used my Cuttlebug and Spellbinders dies to create the card shape.  Then I heat embossed a Basically Bare heart and then layered it with a keyhole.


Ahh, the last card for today.  I inked a stamp with Perfect Medium then covered the stamped imaged with red Perfect Pearls.  A "perfect" contrast to the black cardstock. Then I used two Basically Bare birds and layered them with Glass Bead Gel Medium, and once dry, added a bit of gold ink.


As I said, lots of cards, each with a different look and technique.  Thanks for stopping by today!

Monday, October 29, 2012

Shadows Of A Thousand Years Wall Hanging

Boy oh boy do I have a fun (aka super inky!) project for you today!  I have to admit that I don't usually do much for Halloween as my favorite holiday is in December.  However, once I sat down to work on this project, I was sucked in with all the fall colors!


So let's get started showing you how I created this wall hanging.  To start, I simply covered the corrugated Oh So Mini Album page with patterned paper and then inked the edges with black and orange.

Next, I cut a piece of 5in x 5in watercolor paper and gave it a good spritz with Tsukineko's Goosebumps texture spray.  This does two things for the background.  First, it acts as a resist for the ink that will be added later.  Second, it also adds a really fun texture to the page.

Once the Goosebumps is dry, I started adding liquid watercolors in orange, purple, and black. I just kept adding, layering, and splattering the colors until I was happy with the effect.  Then I mounted the sheet of watercolor to black cardstock and adhered it to the album page.


Next up, I cut out a skeleton and adhered it to the page.  Then I printed the saying, inked the edges, and also adhered it to the page.


Now, on to the embellishments.  I sprayed the felt heart with black ink, then gave it a quick spritz with a glimmer spray. Lastly, I inked the stars with Sweet Melon and Grape Soda Smooch Ink.


For the finishing touches, I added a few crystals and punchinella to the bottom corner and a ribbon hanger at the top.  For a last bit of shimmer, I used a Clear Wink of Stella pen on the skeleton cutout.

Basically Bare items used:
-Bracket Oh So Mini album, corrugated page
-Celestial Shapes Set - felt cloud and chipboard stars

Kuretake items used:
-Zig Millenuim, Pure Black
-Zig Wink Of Stella, Clear

It's also with a heavy heart that I say this will be my last official project as part of the Basically Bare Design Team.  I have had an absolute blast working with everyone on the team.  Hard to believe I have been with the company since they had their product debut last year.  I wish the company nothing but the best!  


This also happens to be my 200th post on my blog!  So, to celebrate, I have a bit of blog candy to give away. This is open to U.S. residents only only due to the cost of shipping.

I have a Tiny Tabs Album, a Timeless Tabs Album, one set of Spring Distress Ink Pads, and an assortment of my choice of Basically Bare embellishments (this link will let you see the full line of embellishments). Just a side note, this giveaway is not in any way affiliated with Basically Bare. All items are coming from my personal stash.

To get entered, simply leave a comment on this post.  You'll get an extra entry if you follow my blog.  And you'll also get an extra entry if you spread the word about my blog giveaway on your blog or website. So, you'll actually have the opportunity for three entries.  All entries will be accepted through November 5, 2012 at 8:00 AM EST, at which time I will select a winner.  Good luck!

Monday, October 15, 2012

Christmas Cheer

It seems like everyone I know is gearing up for Halloween.  But, I'm rebelling!  Today I'm showing you a fun way to mix and match your Basically Bare embellishments from several different sets.


First up, I used two stars from the Celestial Set.  Both were inked in gold, then layered one on top of the other.


Next, I used one of each size of the felt hearts to create a Christmas tree.  I simply turned them upside down and slightly overlapped them at the points of the hearts.  Each was inked with two different shades of green.  For the decorations, I added a bit of May Arts twine and a few crystals.


For the tree trunk, I used a corrugated piece from the Climbing Ivy set.  I pulled the top layer off the piece and then spritzed it with Glimmer Mist. Lastly, I added a small piece of tulle.


.Looking at a side view, you can see all of the dimension in this piece!  With all festive ways to use your Basically Bare embellies, are you starting to get in a festive mood?

Monday, September 17, 2012

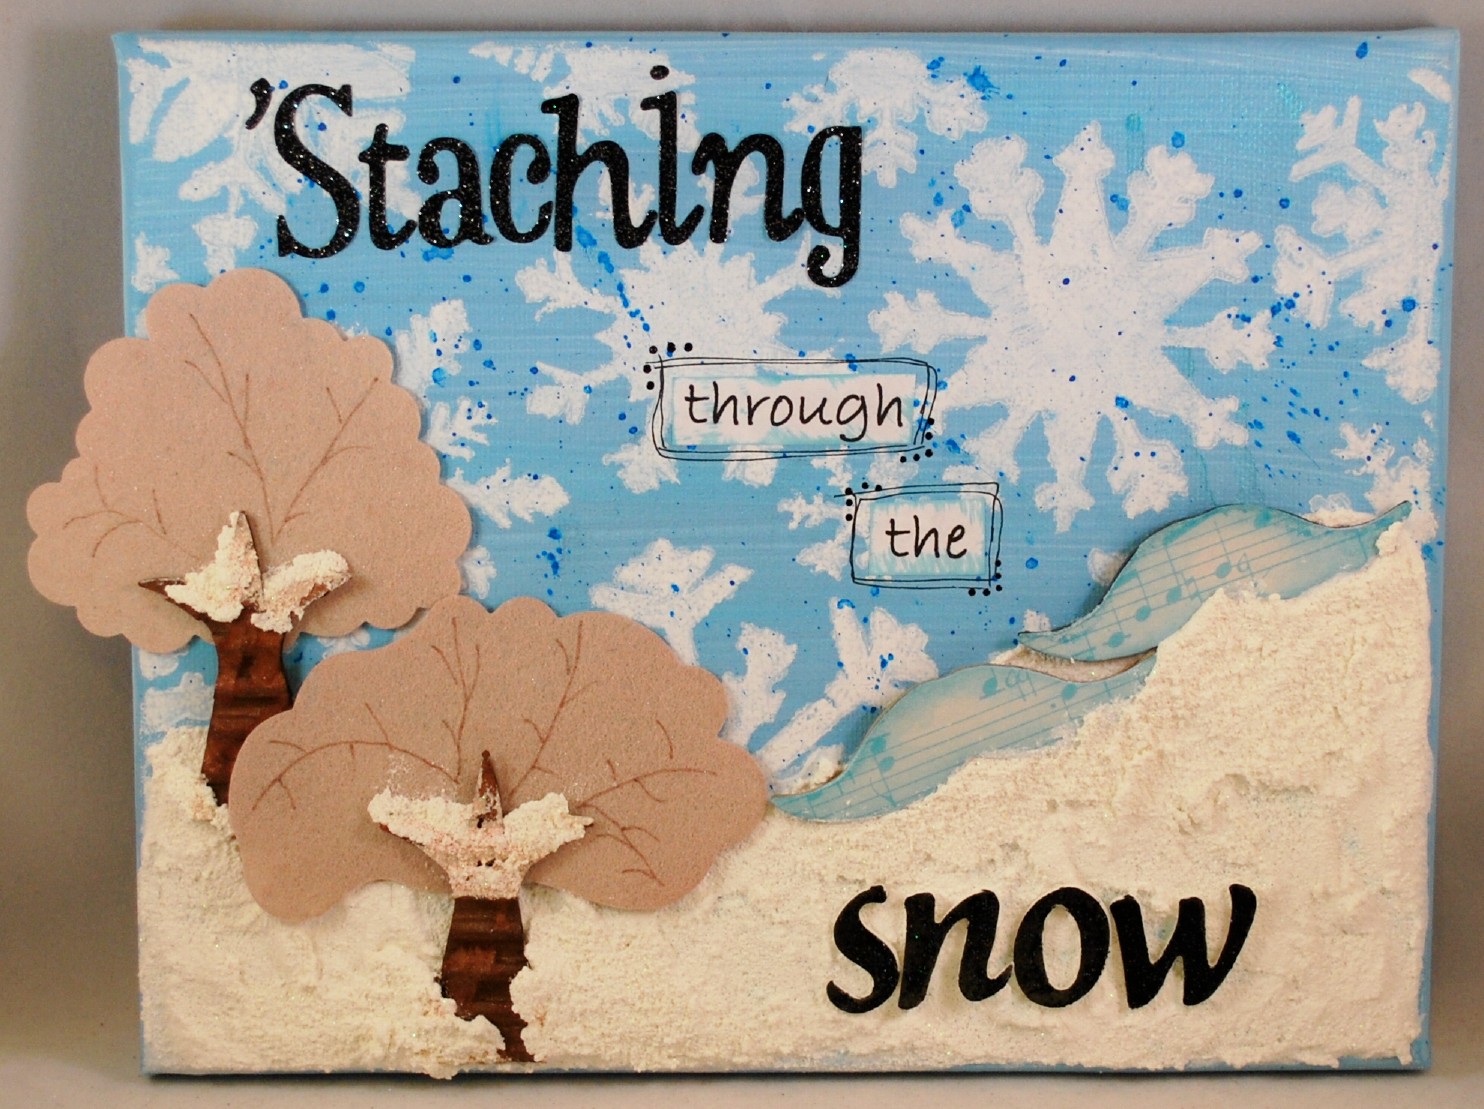
'Staching Through The Snow

Today I have a fun winter project to share.  The weather here is finally starting to cool down, meaning not cold yet but not 100 degrees either.  And it has me thinking ahead to winter fun.

To start this canvas, I painted the background a light blue.  Once the paint was dry, I used a Crafter's Workshop template and stenciled the snowflakes.  Then I splattered ink over the snowflakes for contrast. Lastly for the background, I added a thick layer of SnowTex.  Love this stuff!  I can layer it on thick and achieve a super textured effect.

Both the tree tops and trunks were sprayed with Glimmer Mist. Then I used a brown marker to draw in the tree branches. Next, I added a bit of SnowTex to the tree tops.


On to the 'staches.  I simply covered them both with patterned paper then added a bit of Gelatos to the edges.  I added a bit more Snow Tex around the 'staches to make them appear to be sunk into the snow.  What better way to use a 'stache but as a sled?


With a side view of the canvas, you can really see all the layers of texture.  


And you know I can't make a project without lots of bling, so lets count the number of ways I've added it to this project. :)  Then entire project shimmers and shines.
1.  Glimmer Mist on the trees
2. I added lots of glitter to the Snow Tex
3. Stickles on the word snow
4. I sprayed the entire canvas with French Vanilla Glimmer Mist

Monday, September 10, 2012

Bring Your Own Sunshine Canvas

I recently had the pleasure to work with May Arts ribbon, and let me tell you, I was a gal in ribbon heaven!   Here's what I created with all that ribbon goodness.

When I sat down to work on this canvas, I originally envisioned a fall themed project, full of reds,oranges, and browns.  However, as I started laying down color, the canvas took a completely different spin.  Which is not a bad thing - now I have a super girly canvas with a summery feel to it.


To start, I painted the entire canvas with black gesso.  Next, I next I mixed a few different colors of mica powder with water to make a slurry, then painted the mixtures over the dried gesso.  The color and shimmer of the mica powders just pop on the black background.


Then, I used an acrylic frame from the Fanciful Frames II set.  I wanted just a hint of color on the frame, so I inked my embossing folder and then quickly ran the piece through my Cuttlebug.  The stars were inked with Tsukineko Brilliance Galaxy Gold ink. The sun was painted with crackle paint, and once dry, I added a bit of my mica powder slurry mixture.


Next, I inked my white net ribbon several different shades of yellow and oranges and cut the ends into points.  The ribbon was then layered over several different patterned papers. The two acrylic stars were inked with StazOn ink.


And to finish off the piece, I used a chipboard dress form, which was heat embossed and then covered with Glimmer Glaze.  For the skirt, I really wanted something super feminine and poofy.  I took  my flowers ribbon and cut out the flowers so I could layer them on the skirt.  Since I wanted the dress to really stand out on the dark background, I purposefully left the flowers white and uninked.

Basically Bare items used:
-Dress Form
-Fanciful Frame Set II
-Celestial Shape Set

May Arts items used:
-White Net ribbon
-Sheer Frayed Flowers Wired ribbon

Tattered Angels items used:
-Glimmer Glaze Mellow Yellow

WOW items used:
-Sour Lemon embossing powder

Monday, August 20, 2012

Dos Tarjetas

I'm back with you today to show off a bit of Basically Bare and Authentique!   Today I have dos tarjetas, or two cards, to share with you.

I love the Oh So Mini Mixed Media albums, but I'm not really an album kind of gal.  So, I found another really fun way to use the album pieces - as cards.  All of the pages are 6x6, so they make for a really fun sized card to work with.


For my first card, I started with the acrylic page and used StazOn ink around the edges to create a shadowed effect.


Next, I used Glimmer Glaze on the wings and dress form.  Once the Glimmer Glaze was dry, I added the dress form, a flower, and a few sentiment stickers to the acrylic page.


For the chipboard page, I layered the Authentique paper with a bit of ribbon and punchinella.  Lastly, I inked around the edge of the paper and then used a bit of ribbon to bind the acrylic and chipboard pages together to form the card.


My second card was created in a very similar fashion.  I applied a think layer of acrylic paint to the edges of the acrylic page.  While the paint was still wet, I pressed a paper towel into it to create a really fun texture.


Next, I used three paisleys to embellish the front of the acrylic page.  The acrylic paisley was painted with Glimmer Glaze, ran through my Cuttle bug for texture, then the raised portions were inked with StazOn.  The felt paisley was spritzed with ink, and once dry, I added Enamel Accents dots around the edge. Lastly, I added a bit of Authentique paper, a few crystals, and a mirrored bird to the chipboard paisley.


For the inside of the second card, I layered several sheets of Authintique paper.

Basically Bare items used:
- Oh So Mini Mix & Match Mixed-Media Album - Ticket and Tabbed in acrylic and chipboard
-Paisleys in acrylic, felt, and chipboard
-Dress Form in corrugated
-Wings in chipboard

Tattered Angels items used:
-Glimmer Mist in Yellow Daisy
-Glimmer Glaze in Emerald Cove and Mellow Yellow

Authentique items used:
-Curiosity Collection Kit
Related Posts with Thumbnails