Showing posts with label QKD. Show all posts

Monday, June 10, 2013

Cards Galore!

Today I have another set of super fun cards to share, all of which were featured in the November issue of Scrapbook News and Review Magazine.


This first card I had a lot of fun creating.  I used my Spellbinders die to cut out the middle portion from my patterned paper.  Then I added a a piece of transparency into the space that was cut out.  Next, I stamped the sentiment on the transparency, layered on a few flowers, a chipboard butterfly, and a piece of lace.  I love the look of being able to see straight into the card.


My second card would be perfect for a wedding or bridal shower.  I simply layered on my patterned papers, added a crystal flourish, and a few dimensional flowers. Super quick and simple.


Lastly is a fun, colorful card.  I started with my background paper, layered on a few die-cut papers on top, then finished the card with a stamped image from Queen Kat Designs which was colored with Zig markers. The last finishing touches on this card is a bit of glitter around the die-cut and a bit of ribbon.

Friday, February 22, 2013

Party Animal

Jamie here with you again on a wonderful Friday.  Today I have a fun card to share that uses a new stamp called Dobs by stamp designer Che Gilson from Queen Kat Designs. This was such a fun stamp to work with.  I knew immediately what I was going to make.


I started by coloring the image with my Prismacolor pencils (as usual).  Then I started on the card background.  I layered my papers, added a bit of burlap ribbon, a chipboard arrow, and the sentiment.  Quick and simple, my favorite type of card. :)


And it is with a sad heart that I have to say this will be my last post as part of the Design Team for Queen Kat Designs.  I have enjoyed my time with the company and with the gals on the team, but family life and personal issues have taken over any spare time I've had.  I will truly miss working with the company.

Friday, February 15, 2013

You Are Beautiful

Welcome back to another fun Friday!  Today I've made a tag using the Celtic Fairy stamp by stamp designer Kristie Silva from Queen Kat Designs.  I simply love her facial expression.  So let's see how this tag was made.


First, I misted the background using several different colors of Dylusions inks.  Then, using a stencil and gold dimensional paint, I created the raised portion.  Then I simply layered on the punchinella, baker's twine, butterfly, and the sentiment.


The image itself was colored with Prismacolor pencils and then fussy cut.  Then I simply adhered it to the tag itself.

Friday, February 8, 2013

Hugs

Today I have a stamp called Yeti by stamp designer Kristie Silva from Queen Kat Designs.  Is he not the cutest thing you've ever seen?  And hugging his little toy made it the perfect stamp for a Valentine's Day card.


I started by coloring the image with my Prismacolor pencils.  Next I inked the edges of the cardstock.  The card background was made by layering different patterned papers, adding a bit of baker's twine, a few black buttons, and a felt key.


It all comes together to make one super cute card perfect for that loved one.

Friday, February 1, 2013

Imagine

Jamie here with you on this wonderful Friday morning.  Can you believe we're already into the second month of the year?  So today I have a fun stamp from Queen Kat Designs to share, Moon Girl by stamp designer Laura Macy.

This is such an adorable image!  I had the image colored and the card made in about 30 minutes.  I love it when a stamped image "speaks" to me.  :) But it really does make the creative process so much easier when it happens that way.


The image was fully colored with Prismacolor pencils, then simply mounted on cardstock and layered on the card.  A simple acrylic star was added to completed the card.  Quick and simple, and totally adorable!


Thanks for stopping in today!

Friday, January 18, 2013

You Are Wonderful Wall Hanging

Welcome back!  I've decided to try something a bit different, and I made a wall hanging using a page from the Branded Forever Chipboard Book, the Clockwork Butterfly stamp, and the Mysterious Flowers stamp set, all from Queen Kat Designs

I started by using several different mists and stencils to create the background.  My goal was lots and lots of fun color, and I was very pleased with the outcome.  Then I stamped the Clockwork Butterfly stamp randomly across the background.


Next, I stamped the Mysterious Flowers onto a book page and then colored it with my Prismacolor pencils. The flowers were cut out and adhered to the chipboard page, along with a larger flower and a few die-cuts.


And did I mention the bling?  A few mists of Perfect Pearls spray and the entire piece is covered in shimmer!  Every project must have glitter and shine. :)

Friday, January 11, 2013

My Sweetheart

Good Friday morning everyone!  I was thinking ahead to Valentine's day and came up with the cutest card that uses the Dal stamp from Queen Kat Designs. 


 I really love how this one turned out!  The image and colors are more on the masculine side, making it the perfect card for your sweetheart. :)


The image itself was colored with Prismacolor pencils.  I just simply layered the patterned paper, added the stamped image on top, added a few die-cut stickers, added a bit of glitter to a chipboard heart, and lastly added a piece of punchinella.  Simple as can be.

Friday, January 4, 2013

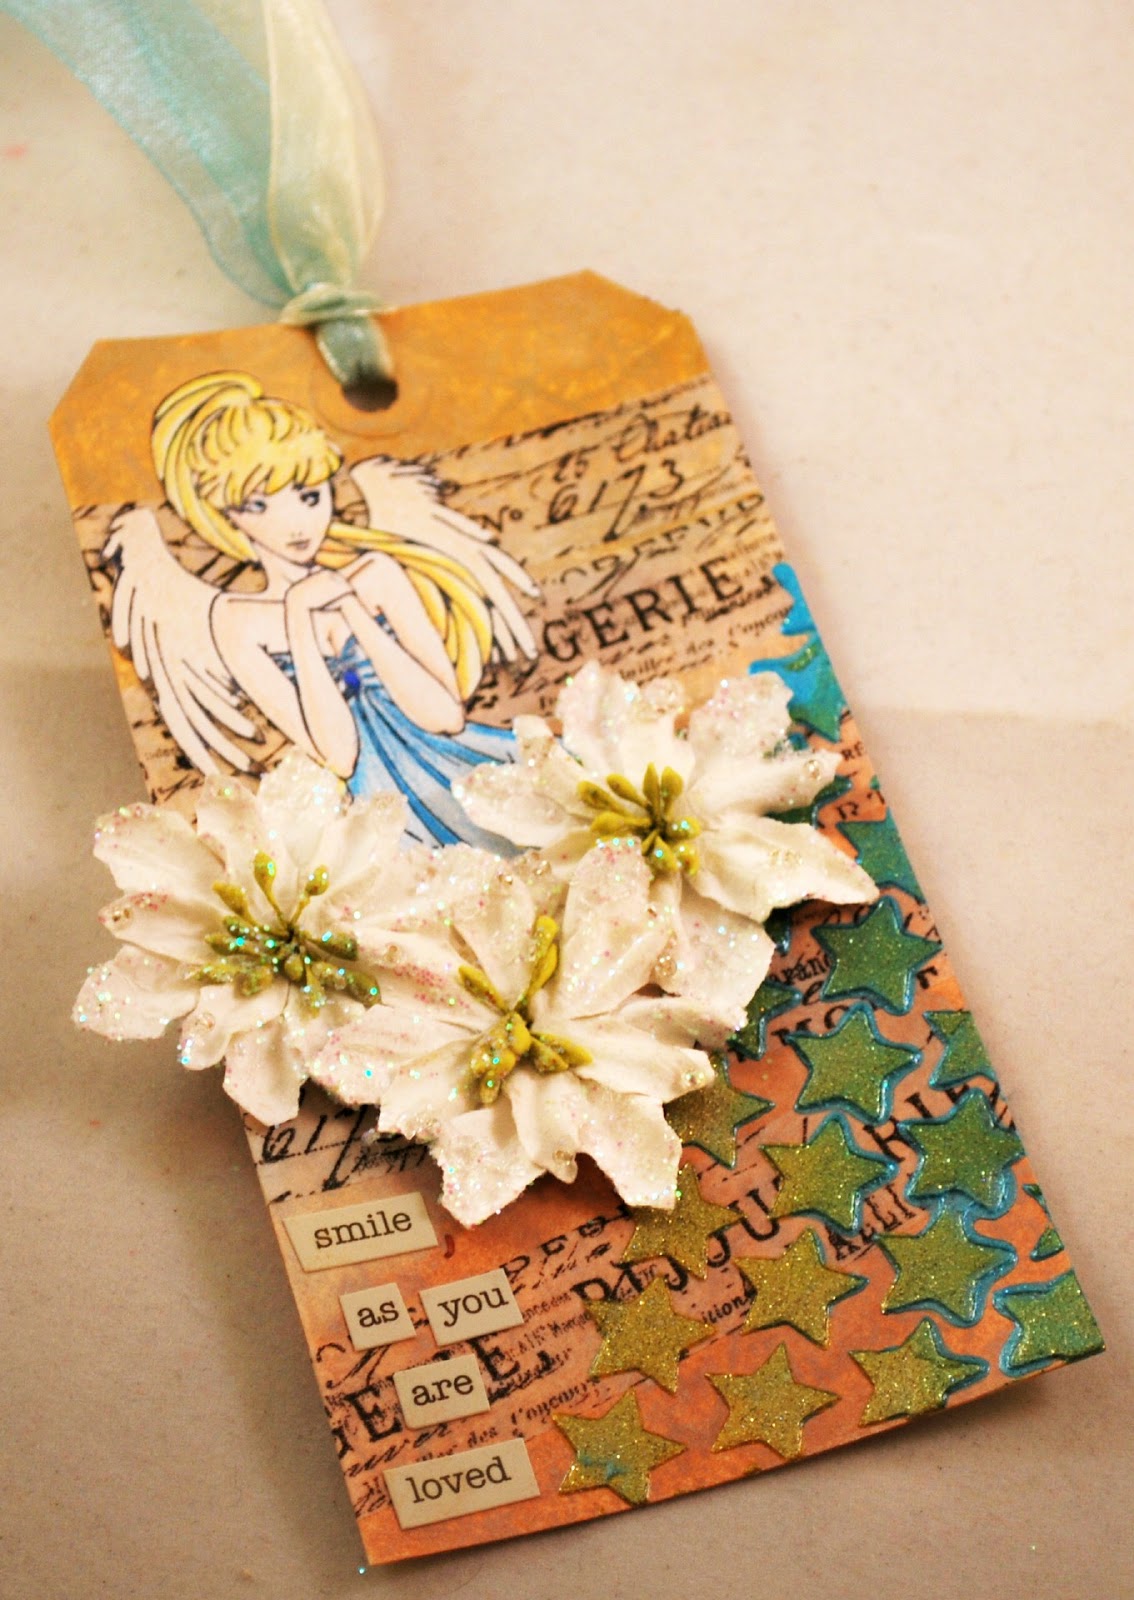
Angel's Delight

I'm back with you today with my first post of the New Year!  And boy do I have a wonderful project to show using the Angel's Delight stamp from Queen Kat Designs.  I thought it would be fun to use a Christmas themed stamp for something other than Christmas.  We all have a stash of stamps, so why not get you money's worth from them?


I've created a wonderful tag for you today.  The background was made using three colors of Metallic Distress Stains.  Then I added a few layers of Tissue Tape.  The stars were created Art Anthology Sorbet and a Crafter's Workshop template.  Such a wonderful way to create texture!


Now it's on to the main image.  I stamped her on white cardstock, colored her with my Prismacolor pencils, then fussy cut her out. Then I layered on a few flowers and sentiment stickers.


There is so much shimmer and dimension on this tag.  Makes you want to run your hands over all the elements!

Friday, December 14, 2012

Merry Christmas

 We're getting closer to the big day, only 11 days left now!

Today I have a super cute card using the new Snow Couple stamp by Queen Kat Designs stamp designer Sandra Caldwell.


For the background, I layered two different patterned papers.  Then, using a Crafter's Workshop template and Modeling Paste, I created several snowflakes.  While the Modeling Paste was still wet, I sprinkled in a bit of glitter.  Everything must have a bit of shimmer!


For the stamped images, I wanted to keep things simple.  I colored around the inside edges with a light blue and then added lots of Stickle accents.

Friday, December 7, 2012

Joy

I am officially on the countdown to Christmas (just over two weeks to go)!  So, to get you in the mood, here is a card using the newly released Cthulhu Christamas stamp by Queen Kat Designs stamp designer Coriander Shea.  Isn't he a cutie with his Santa hat and present?


I found the cutest patterned paper for this card.  All of the red in the trees is foil, so it shines when the light hits it.  I simply layered on a bit of ribbon and chipboard embellies for this card.


The stamped imaged was colored in with my Prismacolor pencils and I added Stickle accents on the present and on the hat.

Friday, November 30, 2012

Happy Fall Ya'll

Is everyone enjoying the cooler weather!  Today I have a card fit for the fall season that uses the Thankful Crow stamp by stamp designer Sandra Caldwell.

Kraft cardstock, orange patterned paper, cream colored ribbon, brown buttons - a perfect match for the season! 


Isn't this just the cutest image?  I colored it exclusively with Prismcolor pencils and added just a bit of Stickles to his hat.


Friday, November 23, 2012

Trim The Tree

I don't know about you, but I've been thinking a lot about Christmas.  My goal is to have all of my Christmas cards made early this year.  Fingers crossed I hit my goal!  


For this card, I used the Reindeer stamp from Queen Kat Designs.  I stamped the image four times and fussy cut each one.  The two in the back I adhered directly to the card.  For the two in the front, I added pop-dots to the back so they stood out on the card.  


Each reindeer has ornaments hanging from their antlers.  Of course, I added Stickles to the ornaments to make then nice and shiny! I also added Glossy Accents to all of their hooves and noses so they were nice and shiny.  Lastly, I added a bit of White Enamel Accents to each of their tails.

Monday, November 19, 2012

Hugs and Kisses and ...

In celebration of Queen Kat Designs 6th birthday, we're having a blog hop!  

So you don't miss anyone along the way, here is the full list of the blog participants.
Jamie (that's me!)

Today I have an adorable wall hanging that uses the Beautiful Dancer Fairy stamp by stamp artist Amy Brown.  I absolutely love this fairy!


To start, I used a Basically Bare Scalloped Oh So Mini Album chipboard page and covered it with patterned paper.  Then, using a Crafter's Workshop template, I cut out a lighter piece of patterned paper and adhered it to the album page.


Then I stamped, colored my fairy with Prismacolor pencils, and then fussy cut her out.


Lastly, I added a chipboard flourish, which was painted with a Zig Woodcraft marker, a few Prima flowers, and a couple of mirror embellishments.

Thanks for stopping in today.  Now, off you go to Vikki's blog to see the next creation on the blog hop!

Supplies:
Basically Bare Scalloped Oh So Mini Album
Zig Woodcraft marker in Antique
May Arts ribbon

Friday, November 16, 2012

Define Good

Is anyone else out there thinking about how close we are to Christmas?  Not to add any pressure, but it's less than six weeks away. :)

My tag today was most definitely inspired by the upcoming holiday.  I used the Sugarplum stamp from Queen Kat Designs. This really is a fun and playful stamp!


To make the background, I mixed Picket Fence Distress Stain with Red Pepper Color Wash on my craft sheet then ran my tag through the mixture.  Then, I spritzed it with a glimmer spray and then with water to add water spots.  A very fun way to make a background!


 The image was colored with Prismacolor pencils, and then I added L...O...T...S of Stickles.  It must be glittery and shiny. :)  I think the sentiment is a perfect match to the image, just a bit on the naughty side.

Friday, November 9, 2012

Men, Coffee, and Chocolate!

I had an absolute blast working with this stamp.  As soon as I had my ink covered hands on this stamp, which is called Roobios Tea from stamp designer Che Gilson, I had it stamped, colored, inked, and a finished card in under 30 minutes!  Gotta love it when the planets align and things just work out.

For the card itself, I covered the background with a layer of patterned paper, then layered a lighter color paper on top.  I used a Zig marker to create a faux stitching around the edge of the paper.  Next, I inked a piece of May Arts ribbon and layered it on top of the paper.  The last bits I added were the buttons and sentiment.


The image itself was colored with my ever present Prismacolor pencils.  This really is the cutest image!


Friday, November 2, 2012

Moth Queen

I'm back with you today with another card using the Moth Queen stamp from Queen Kat Designs. This is a really fun stamp to work with.  My mind kept going to all the different color combos I use with her hair!

I am currently in the middle of a huge project using book pages.  So I decided to steal a page from that project and use it as the background for this card.  I simply inked the book page with Distress Ink, then flicked some Dylusions ink and water  to give it a splattered look.  


Next, I colored my stamped imaged with Prismacolor pencils then double mounted it patterned paper.


Lastly, I added a bit of pom-pom trim and a a few flowers.  You may have noticed this card does not have a sentiment.  This was on purpose.  I like to have a stash of cards on hand that I can grab in a pinch and add whatever sentiment I need, whether it be for a birthday or a quick pick-me-up.

Wednesday, October 31, 2012

Lots of Bats

Today is the day for all the good little girls and boys to dress up and be whatever their imagination can come up with. 

So it's time for one last Halloween card, which uses the Halloween Fairy stamp by Queen Kat Designs.  This card was also featured in Scrapbook News and Review Magazine


It couldn't have been easier to create.  I simply started with black cardstock and alternated between that and orange cardstock for the background.  The image was then stamped onto white cardstock and colored with Prismacolor pencils.  Next, I used my Cuttlebug and dies to cut out some bats. Lastly, I added a bit of black floral trim.  

Have a spooktacular Halloween!

Friday, October 26, 2012

Los Muertos

Are you ready for a fun Halloween inspired card?  Jamie here with you today with a super fun card using Queen Kat Designs Day Of The Dead Girl #2 stamp by stamp designer Carissa Rose.


Who says a Halloween card has to use the traditional black, orange, or purple color theme?   I LOVE the colors on this card!  Such a super feminine feel with fuchsia and teal. With the image mounted on black cardstock, her hair color simply pops off the card.


The entire image was colored with Prismacolor pencils.  I also stamped the image a second time and cut out the two butterflies.  Instead of coloring them, I simply spritzed them with Perfect Pearls mist (because you know every project have a bit of shimmer and shine).  Once the were cut out, I folded the wings up so it would create a bit of added dimension on the card.

Friday, October 19, 2012

Oh, Balls!

Jamie here with you today to share another uber sexy stamp from Queen Kat Deisigns called Jester by stamp designer Charles Bristow.  I've been working on a lot of Christmas projects recently, which I think carried over into this card. But I love how it turned out!  The red is a perfect contrast to the black.


The sentiment was 100% inspired by the balls she is juggling.  And to highlight the balls and create a bit of added dimension, I added a few gold balls to the image.


I kept the colors to a minimum, using on red, black, and flesh tones. Of course, everything was colored with my favorite item - my Prismacolor pencils. :)

Friday, October 12, 2012

Inner Goddess

Jamie here with you again today with a sinfully sexy stamp from Queen Kat Designs stamp designer Charles Bristow called Evil Queen. I wanted the main image to contrast with the background, so I purposefully left her mostly uncolored. 


I used red as my primary background color, which is a nice contract to the black and white of the main image.


Everything was colored with Prismacolor pencils, and I added a bit of red Stickles at the bottom of the image.  Everything has to have a bit of sparkle and shine somewhere!
Related Posts with Thumbnails