Saturday, June 11, 2011

Tag Tutoral

Scrapbook News and Review Magazine recently had an event showcasing tags, arches, and ATC's made by the staffers. Now I can finally share my creation with you.


I had a blast working in this tag. Instead of using paper as my background, I experimented and used fabric. And what a fun medium to play with too! I will warn you, this tag is technique heavy, but don't let that discourage you at all. For me, that's one of the best things about making projects is the discovery of new techniques to add to my arsenal.
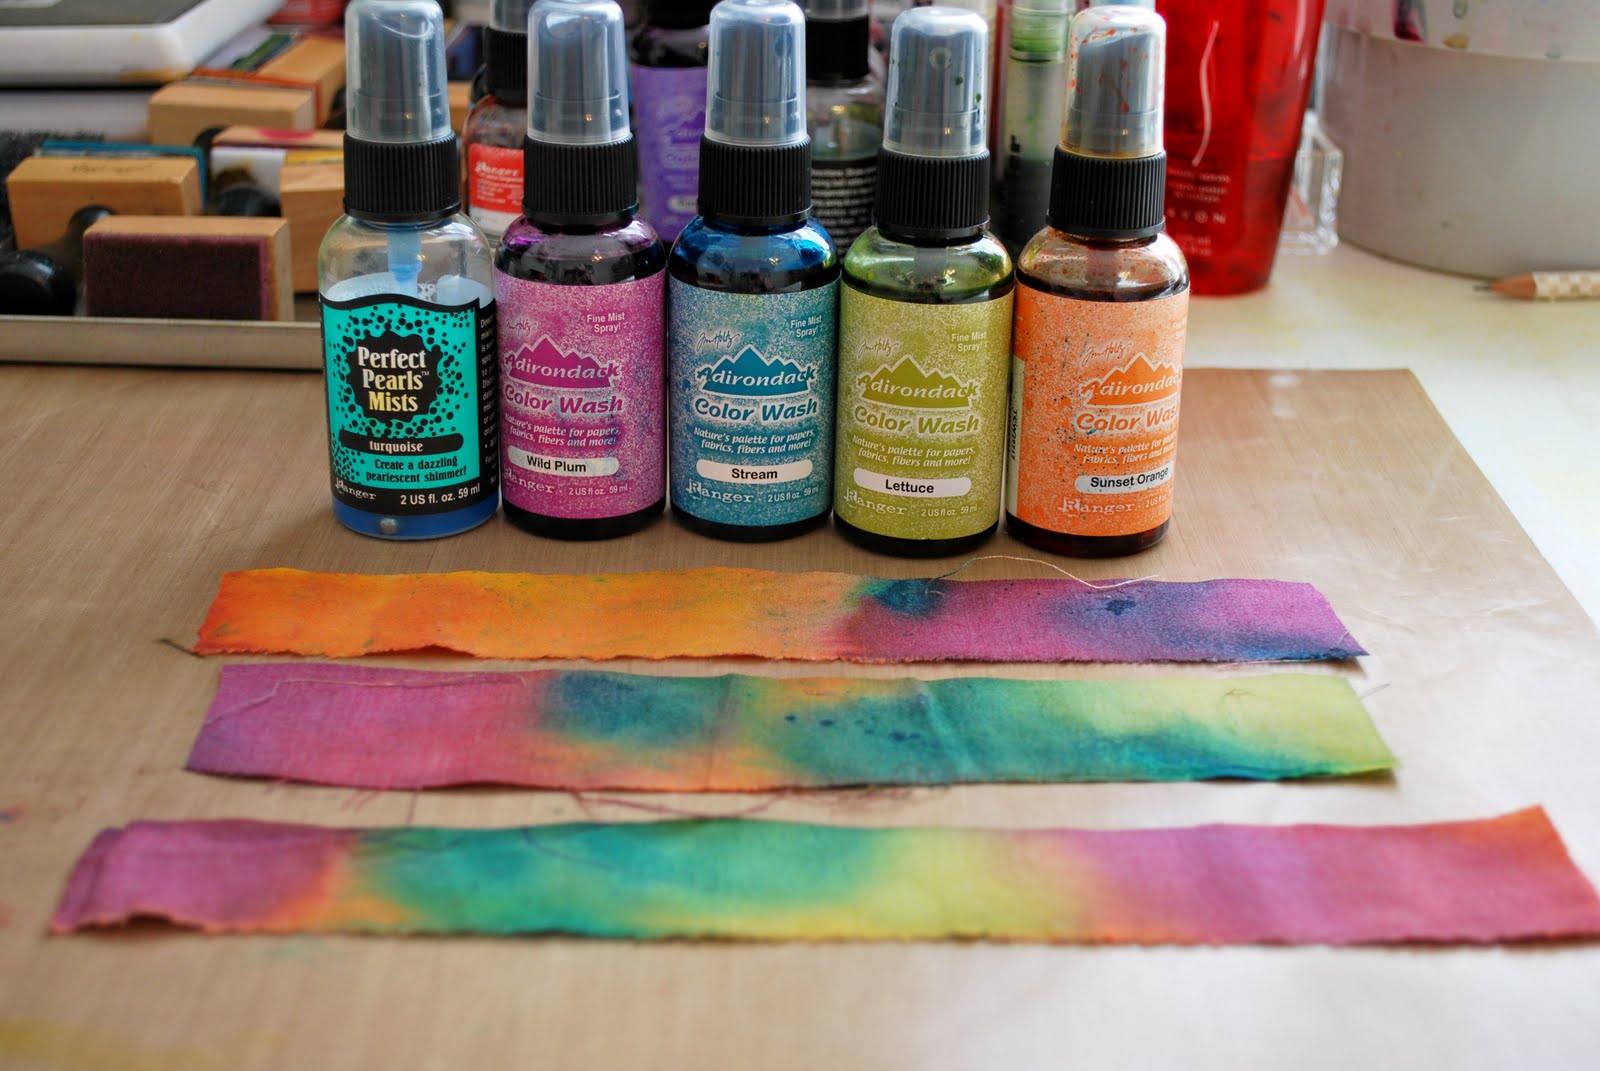

Step One: Take three strips of white fabric and cut to 2 1/2 in by 6 1/2 in each. Randomly spritz with color until thoroughly saturated. Set aside to dry.


Step Two: Once fabric strips are dry, use a brush to coat the cardstock with gel medium.


Step Three: Apply fabric strips to cardstock base, slightly overlapping each strip. Set aside to dry.


Step Four: Once the gel medium is dry, trim cardstock to 6 1/4 in by 3 1/2 in and also round the corners.


Step Five: Using a Crafter's Workshop template and white ink, add circle designs on top of the fabric.


Step Six: To start the beaded fringe, bring up a beading needle from the back to the front of the cardstock and start adding beads. Continue adding beads to the thread until you have about a 12 inch length of beads.


Step Seven: To start forming the loops, bring up a second thread from the back of the cardstock.


Step Eight: Section off approximately 35 beads so you can see where the loop will be placed. Run the second needle under the thread of beads and then take the needle back down the same hole as it was brought up.


Step Nine: Continue forming loops across the width of the cardstock. Once the beaded fringe is complete add a length of floral ribbon across the top to hide the stitch marks.


Step Ten: Using a grip patterned background stamp and white ink, stamp the top right corner of the tag.


Step Eleven: Using a waterproof ink and watercolor paper, stamp wings and cut out.


Step Twelve: Add a drop of color wash onto a craft sheet and add a few drops of water to dilute the color. Brush the color onto the wings.


Step Thirteen: Apply alcohol ink to the back of the clock face.


Step Fourteen: Attach keyhole and wings to clock face.


Step Fifteen: Attach embellishment to tag. Print out quote and also attach to tag.

Thursday, June 9, 2011

A Whale of a Card

It's time for a bit of fun with a children's birthday card!


When is a paisley not a paisley? When it's transformed into a whale of course! :) I used the Basically Embellies Paisleys to create a super cute whale.


Using the corrugated chipboard from the set, I inked the entire piece with a light blue ink. Once the ink had dried, I used a brown Zig marker and added dots around the edge and then drew a mouth. Lastly, I adhered a googly eyeball to finish the face.

For the water spout, I coated the entire piece with adhesive and then dipped in it glitter.

The "waves" were created by using a 2in circle punch and overlapping the punched circles.

Until next time, keep thinking outside the box. You never know what "creatures" your embellishments might become.

Monday, June 6, 2011

Time To Get Inky

This is my DT entry for the first June challenge at BetterScrap.com. Head on over and play along for a chance to win the monthly prize!


The challenge was to create a layout showing what I do when things don't go my way or I have a bad day. The first thing that immediately came to mind was to get inky. There's just something completely relaxing for me when I get lost in a world of creativity. I crank the music up so I can drown out the world around me and go to town. An yes, after a good play date in my scraproom, my hands look just like this. :)

So, what do you do when it feels like the world is conspiring against you?

Thursday, June 2, 2011

Dress Form Card

This is my first project as part of the Basically Bare Design Team! Just bare with me as I get all my excitement out! For this project, I just couldn't resist the call of the Basically Embellies Chipboard Dress Form.


The chipboard takes color and dry embosses like a dream. I inked the entire surface with Liquitex acrylic ink and once the ink was dry I ran it through my Cuttlebug using the Swiss Dots embossing folder. For contrast, I used a white ink pad and lightly inked over the raised areas. The bottom of the dress form was then inked with gold alcohol ink. To finish off the dress form, a crown charm was added to a piece of ribbon which is tied around the waist.


This card would be perfect for a loved one or special occasion. Basically Bare {Basically Embellies} are so versatile that they can be used bare, dressed up, dressed down, inked, embossed, etc. Just let your imagination have free reign and there's no end to what can be created.

Tuesday, May 31, 2011

ATC's Galore!

All of these ATC's were featured in the April issue of Scrapbook News and Review Magazine. And if you haven't tried one yet, what are you waiting for? They are a fun way to be creative but also have the instant gratification of a quick project.

The first ATC was very simple to create. The background was inked with several colors of distress inks, ran through a Cuttlebug, then inked again with a darker color of distress ink. The second inking brings out the emobssed areas. Then the foreground area was stamped and inked, the edges were torn, and then a few beads were added to the corners.


The second ATC was stamped, then the background inked with several colors of distress inks, then the entire surface was coated with crackle paint.


This last ATC was created in a very similar manner. The background was again inked with several distress ink colors and then the images were stamped.


All three of these were created using very similar techniques, but the end product on each one is stunning and unique.

Thanks for stopping by and I hope I've inspired a but of creativity for you today.

Thursday, May 26, 2011

The second May challenge is up at Better Living Through Scrapbooking. Head on over, create a layout (or two or three), and get entered for the May challenge prize, a gift certificate to Gauche Alchemy.


This was my DT contribution. I had the freedom to choose my own theme this time, so I let my photos be my inspiration. I just went looking through all of my pictures until I found one that screamed out to the scrapped.

Tuesday, May 24, 2011

Crayon Resist Stamping Tutorial

Crayon Resist Stamping is a fun technique that allows you to quickly and easily create highlights in stamped images. And with multiple variations on the technique, it's one you won't easily become bored with.


Start by gathering all necessary supplies.


Step One: I wanted to create a background so I chose two similar flower stamps, one just slightly smaller than the other and randomly stamped both flowers onto the cardstock. Allow the ink to fully dry on the cardstock before moving on to the next step.


Step Two: Using a wax crayon, trace areas around the flowers where you want to highlight, keeping in mind that any areas that have been highlighted with the wax crayon will resist any future applications of ink. As the crayon I was using was clear, it's really hard to see in the picture but it does show fairly well in the bottom flower with the light reflecting off the wax.


Step Three: Add desired ink colors to complete the background. Tip: The darker the ink colors used, the more the resist areas will stand out in contrast.


Step Four: To complete the card, I added a bit of glitter glue in a few places for a bit of sparkle and then added the sentiment and butterfly.

Variation One - Crayon resist on colored cardstock


This variation is done using the first three steps above, with the only change being using a colored cardstock instead of white cardstock. This option gives a nice tone on tone color.

Variation Two - Multiple layers of color


For this variation, use steps one through three above; however, with step three use a light colored ink. Once the ink has dried, repeat step two and add highlight areas with the wax crayon in different spots than the first time. Then repeat step three, this time using a darker color ink. Once you have completed the second inking, you will have areas of white showing from the first resist, then areas of the lighter ink showing from the second resist.

Tuesday, May 17, 2011

Thank You Card

Here's a card that was in a previous issue of Scrapbook News and Review Magazine. I love to make shaped cards. Something a bit different from the standard card shape. And of course, what card would be complete without a bit of bling?


I hope you've enjoyed your visit today and will be inspired to make your own fun creations!

Tuesday, May 10, 2011

Eclipse Stamp Masking Tutorial

Here's a fun stamping tutorial that I hope you will enjoy.


Stamp masking is a wonderful way to combine multiple stamps together to create new and unique images. And it really is an easy technique to master.


Start by gathering all necessary supplies - cardstock, stamps, ink, scissors, and repositionable adhesive (not shown).


Step One: This technique takes just a bit of pre-planning prior to actually stamping. You'll first want to determine which image will be in the foreground and which image will be in the background. In this case, the fairy image is the foreground image so it will be stamped first.


Step Two: On a scrap piece of cardstock, stamp the fairy image again and cut it out.


Step Three: Take the image that was cut out and, using a repositionable adhesive, adhere it directly above the first stamped image. Since both images were stamped onto white cardstock, I have inked the cut out image so it is easier to see.


Step Four: Stamp background image and then remove the cut out image. Now you have a layered stamped image that only needs to be colored and added to any project.

I hope you've enjoyed this tutorial and will give stamp masking a try.

Tuesday, May 3, 2011

Layouts Inspired by Tybee Island

Both of these layouts were in previous issues of Scrapbook News and Review Magazine and I can finally share them. They were inspired from a recent trip to Savannah and Tybee Island, GA. Such a beautiful area to visit and full of history.

The pictures on this first layout were taken in the Savannah City Market, right in the middle of the historic district. The horses are used for carriage tours through the cobblestone streets of the city. We just happened along when they were all resting.

The pictures for the second layout were taken at the Tybee Island Lighthouse in the Lighkeepers cabin. My niece found a mirror and was playing with the camera. She did manage to get a good picture of herself.


There are my inspirations, what's yours?

Tuesday, April 26, 2011

Subtractive Masking Technique

Here's a fun tutorial I had in the March issue of Scrapbook News and Review Magazine. Grab your alcohol inks and clear acrylic and get ready to play!


Apply 2-3 different colors of alcohol ink to the applicator and apply ink to surface. Tip: Leftover plastic clamshell containers are an economical alternative to store bought acrylic pieces.


Ink stamp well with StazOn and stamp image onto surface.


Tip: This technique offers better results if the ink pad is freshly inked. A wetter ink pad equals more ink on the stamp thus allowing a longer drying time.


Using a damp cloth, quickly wipe away the stamped image. The StazOn will "lift" the alcohol ink from the surface revealing a blank background. Tip: If any alcohol ink remains in the stamped area, re-ink your stamp and carefully re-stamp the image in the same spot and quickly wipe away the image. The larger the stamped area the more difficult it will be to remove the alcohol ink.


Flip piece over so the inked side is now facing the table. Using a gold pen, outline all edges.


Using Stickles, outline the revealed area where the image was stamped and set piece aside to dry.


Take a small amount of Flowersoft and place in a small bowl. Add a few drops of alcohol ink and mix the ink into the Flowersoft. Tip: if you don't have Flowersoft, you can make it yourself. Take a piece of Styrofoam and grate it using a cheese grater. It's super messy to make but gives the same effect.


Once the Stickles has dried, stamp vine image under the bird. Tip: this step is only to help me visualize where to place the glossy accents in the next step. If you are able to visualize the placement, this step can be omitted.
Cover the stamped vine with Glossy Accents.


Cover the Glossy Accents with the colored Flowersoft and set piece aside to dry. Once dry, add sentiment and final embellishments. Tip: Take the leftover Flowersoft and place in a small plastic bag for use on other projects.


Finish the piece by embellishing with the flowers and a butterfly.

I have tried this technique on glass and metal and it produces the same great results as it does on acrylic.

I hope you've enjoyed this tutorial and I'd love to see your creations with this technique!

Tuesday, April 19, 2011

ATC's

Time for me to share a couple of ATC's that were in the February issue of Scrapbook News and Review Magazine. If you haven't tried your hand at making these, you really should. It'a a great way to release your creative energy. It's also the perfect medium to try out new techniques due to their small size, 2 1/2 in by 3 1/2 in.

I absolutely love how this one turned out. The background was masked with a Heidi Swapp mask, then painted with watercolor paints. Once the paint was dry, I just continued adding different stamps.


For the second ATC, I have a vision of a corset being laced up, which easily translated to ink and paper. Add in a bit of watercolor paint for the background and heat embossing for the chipboard elements, and I think my vision turned out very well.


I hope you've enjoyed your visit here today!

Tuesday, April 12, 2011

Cupcake Shaped Treat Holder

Is this not the cutest thing you have seen! I just love how this turned out! It was in the February issue of Scrapbook News and Review Magazine.

A treat holder like this would be perfect for birthday parties! And it was super easy to make. The base of the card was made using a Tim Holtz die. I simply cut the rosette four times and then adhered each one on top of the other, staggering the layers.

The top portion of the cupcake is made using a Styrofoam ball in half. Each of the cardstock circles is attached to the Styrofoam using a straight pin.


And the candle was made using cardstock and rolling into a tight roll, adding a piece of twine for the wick, and then adding a few drops of glossy accents to mimic melting wax.

I hope you've enjoyed your visit today!
Related Posts with Thumbnails