Friday, March 16, 2012

Nuggets Of Wisdom Album Part 1

Today I have a fun album to share that was in the Basically Bare CHA 2012 booth. When I sat down to work on this album, I was in a fun, lighthearted mood. That being said, this album clearly shows off the mood I was in.


I used the acrylic page as the front album cover. It was colored entirely with alcohol inks and then, using a Crafter’s Workshop template, I added highlights to the page with Liquitex Glass Bead Gel Medium and StazOn Ink.


I highlighted the next page with lots of clear embellishments. The gear was inked with two colors of alcohol inks.


On the next page, I used WOW embossing powder around the edges of a dress form and on the stand.


Did you know you could heat emboss on felt? Yes, you can!! Just be very careful not to burn the felt, because it will scorch very quickly. Both of the felt flowers were heat embossed. The smallest chipboard flower was spritzed with Tattered Angels spray and the little bird was colored with alcohol ink.


On the next two pages, I’ve used the Sew Vintage chipboard embellishments. Te spool as colored with Tattered Angels mist then wrapped with cording from Canvas Corp.


The scissors have been heat embossed with WOW embossing powders.

Check back on by blog for the second half of this fun, witty album!

Monday, March 12, 2012

Layouts to Share

Who knew it would be well over a week without a post? Time flies when you're busy! Anyway, here's two layouts that were previously featured in Scrapbook News and Review Magazine

This first layout is of one of my youngest nieces. She loves dogs, even the not so real ones! This picture was just too cute not to scrap. This was a quick and simple layout. I used a dry brush technique to paint the blue onto the back ground, then cut out circles from different patterned papers and adhered it onto the background.


This second layout I did a bit of masking and added color to the middle of the page. Then I punched a border strip for the bottom of the page, matted the photo so it would stand out, then added the pennants across the bottom as part of the title.


Two super fun layouts of my nieces, the oldest who is celebrating her 14th birthday today. Seriously, where does the time go?

Friday, March 2, 2012

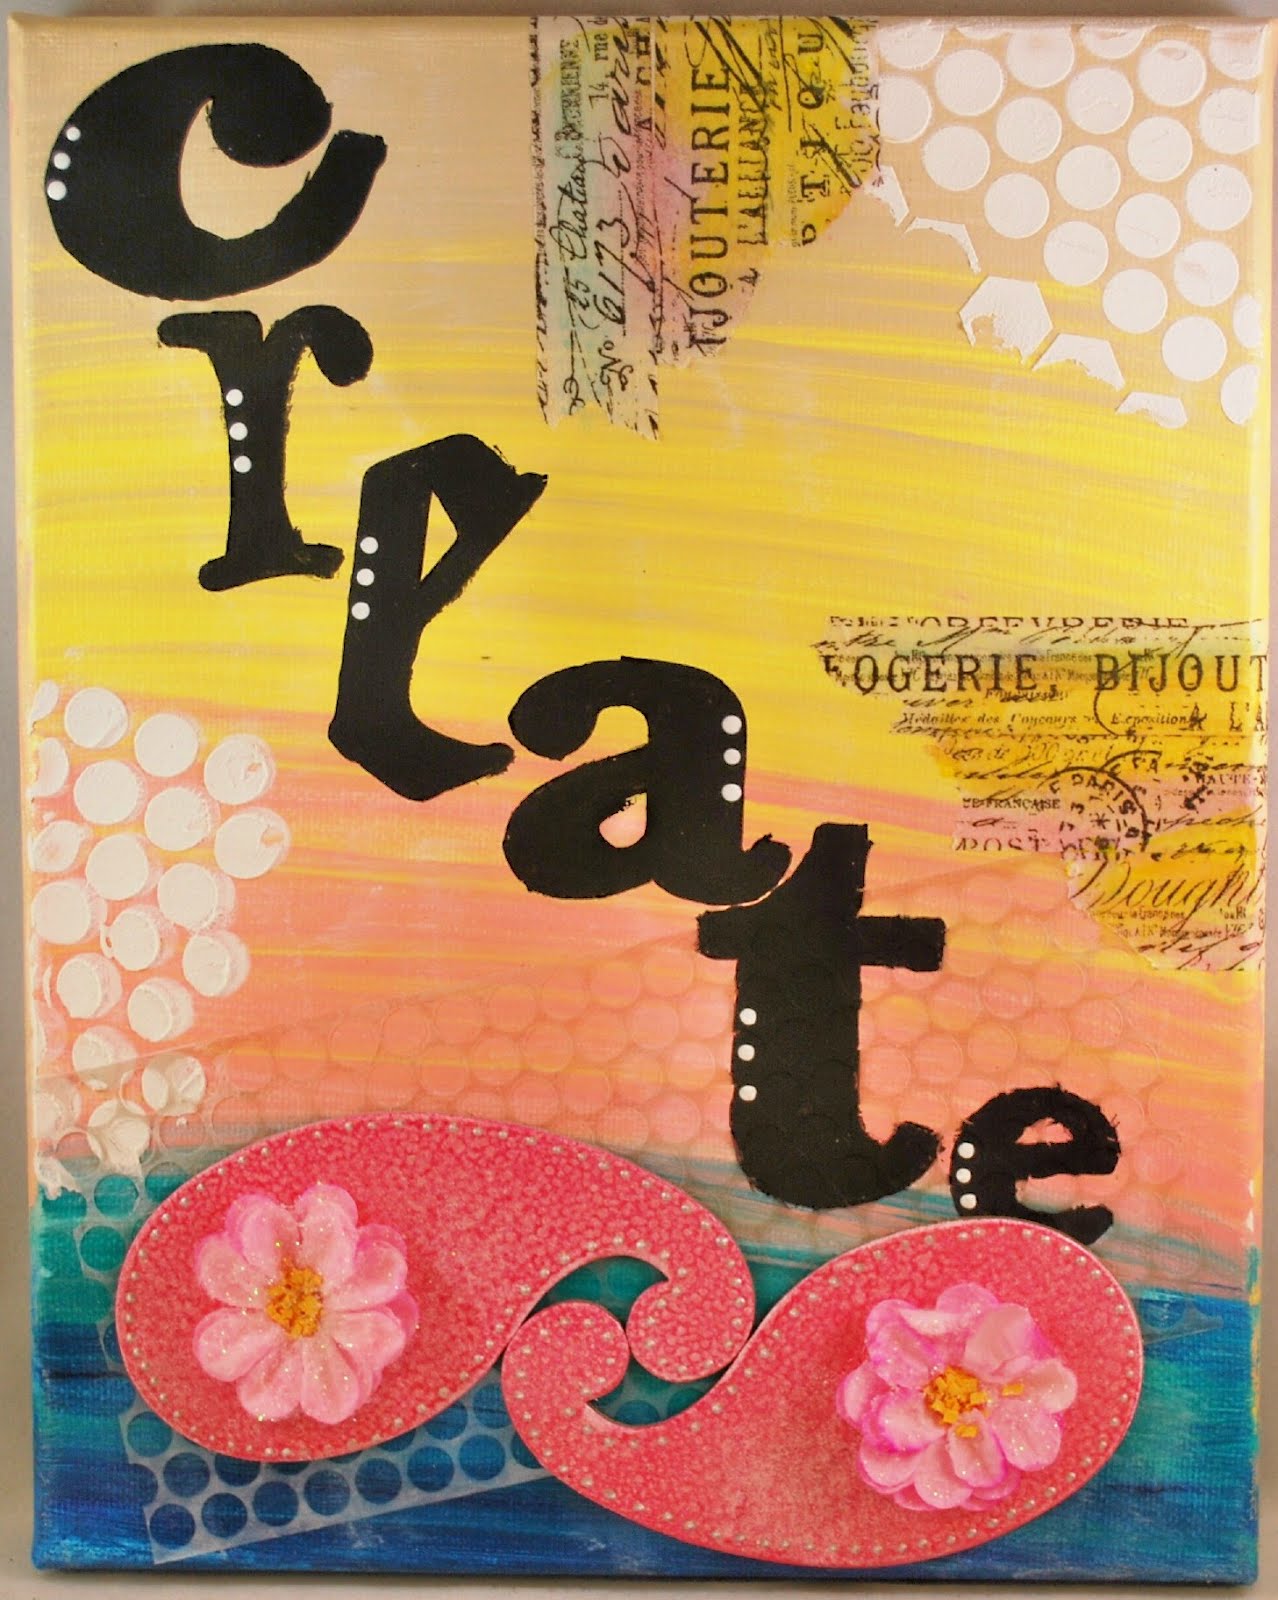
Create Canvas

I'm back with you today to jump start March with a fun canvas. I've had a major case of scrapper's block recently, so I thought I'd try something just slightly different to try to get those creative juices flowing again. Guess what? It worked!


I started the background by using Claudine Hellmuth's Studio Acrylic Paints and just slightly blended them together. Then I used a Crafter's Workshop template and Liquitex Gesso to create the circle texture. Next, I added a bit of Tissue Tape and added the color using Gelatos Ink. Then I added a strip of clear punchinella and then painted on the letters.


Now, on to the good stuff! I used Basically Bare Paisleys to add a bit of dimension to the bottom of the canvas. I heat embossed them both with two layers of Bubble Gum WOW embossing powder.

By just slightly overheating (but not burning) the embossing powder, I got this really cool mottled look. I wanted to add just a bit of shine to the paisleys, so I heat embossed a layer of clear embossing powder on top of the pink.


For the finishing touch, I added a couple flowers to the paisleys and used a bit of puff paint around the edges.

Tuesday, February 28, 2012

Cards to Share

Today I have a couple of really fun cards to share. The first one is full of Basically Bare goodies.


I simply misted the patterned paper with a couple colors of Ranger Color Wash and then added the ribbon. The acrylic heart was inked around the edges with StazOn ink and the chipboard heart was painted with Ranger's Distress Crackle Paint. To finish it off, I added a playing card and a crocheted flower.


This second card is a quick and easy one to put together. I inked all the way around the card with Distress ink using the ink pad directly to the paper. Then I cut out circles from three different patterned papers and adhered them to the card. Lastly, I stamped my sentiment on a chipboard diecut and then layered the diecut over a ribbon.

Saturday, February 25, 2012

Heart Of Joy

Is everyone wishing for the end of Winter and the dawning of Spring? For sure I am, and it shows in my current projects. I'm here with you again today with a wonderful Spring inspired card.


I started the background off with a gorgeous paper from Webster's Pages and then stamped the entire background with a script stamp.


Now, on to creating the heart. I spritzed a Basically Bare canvas heart with water until it was thoroughly saturated. Then I used two colors of Gelatos ink and just scribbled the color onto the heart. Then, using the best tool in my scraproom (my fingers!), I blended the colors together. Getting my fingers inky is half the fun!


Once the heart was dry, I layered on two sizes of Basically Bare felt wings and hand stitched them to the heart. The butterflies were punched from a transparency sheet, inked with alcohol inks, then adhered to the heart.

Until next time, keep those creative juices flowing!

Tuesday, February 21, 2012

Earrings Time Two

I'm back with you again today with a project that's a bit different for me - a couple pair of earrings for a certain teenager.


Both sets of earrings use Basically Bare Basically Embellies Buttons. This first set uses the chipboard pieces. I simply added some ink and paint to the buttons. Once the paint was dry, I just layered one button on top of the other.


Once the ink was dry, I just added some jump rings and a charm. Super simple.


The second set uses the Acrylic buttons, which were inked with alcohol inks. These were also layered, but instead of centering the pieces, I matched them up at the top for a layered look.

Friday, February 17, 2012

Faux Cloisonne Tutorial

Here's a quick tutorial I created a while ago for Scrapbook News and Review Magazine. I hope you enjoy!


Step One: Using embossing ink and black embossing powder, heat emboss the entire surface of the chipboard heart.


Step Two: Continue adding layers of embossing powder and melting until you have a thick layer of embossing powder built up. I had built up five layers of embossing powder when I was finally happy with the thickness.


Step Three: Allow the heart to cool completely then ink the surface with Perfect Medium and choose a variety of Perfect Pearl colors.


Step Four:Randomly apply the Perfect Pearls to the heart.


Step Five: Ink stamp with gold pigment ink. Reheat the heart until the embossing powder is melted and then stamp firmly into the heart. Hold the stamp on the heart for a few seconds until the embossing powder is cool again. When the stamp is lifted away from the heart there will be a deeply etched image.


Note: Due to the black background, the bright color tone of the Perfect Pearls changed to a beautiful jewel tone. This technique can be done with clear embossing powder and the Perfect Pearls will retain the same color tones. This technique can also be used on a variety of surfaces, glass and Grungeboard just to name two.

Sunday, February 12, 2012

Teck-Neek Paluza Album Part 3

As promised, I'm back again today to show you how I created this adorable album page.


Step One: Heat emboss stamped image with clear embossing powder. The embossing will work as a resist when the background colors are added.


Step Two: Choose the colors you want for the background. I have a good mix of colors ranging from light to dark.


Step Three: Randomly apply to the colors to fill the entire page. Using a damp cloth, lightly remove any ink on the embossed areas.


Step Four: Using the Branches Reversed Crafter's Workshop template and White Zig Posterman Extra Fine Tip pen, trace the outline of the tree branches.


Step Five: Color in the trees completely.


Step Six: Mix a tiny amount of shimmer powder into White Opaque Flake Medium. I used roughly about a tablespoon amount of the medium.


Step Seven: Spread the mixture over Punchinella Crafter's Workshop template. Allow to dry, which generally takes 24 hours or so, depending on the humidity.


Step Eight: Randomly stamp images onto the background using your favorite stamps and inks. The stamps used here are Stamper's Anonymous.

The leaves were inked with the same Tattered Angels and Zig inks used on the background. The veins on the leaves were drawn on using a Brown Zig marker.

The owl was full inked with a light brown color. The highlights on the ears and chest were drawn on using the same Zig pen used on the trees. The edging on the wings were made using a very loose blanket stitch and lastly I added the googly eyeballs.

On a side note, I do want to a quick tidbit on using templates and stencils with dimensional mediums. Be sure to wash the template **immediately** to remove the mediums. Once it dries on your templates, it's permanent. And due the lumpy, bumpy nature of the most mixed media gels, your template will not lay flat on the page if this happens. Sadly, this is a lesson I learned the hard way.

Saturday, February 11, 2012

Teck-Neek Paluza Album Part 2

Ready to see what I have in store for you today? Let’s get started on the second half of the album.


The background was inked with several colors of water based inks. Then, I simply allowed the inks to run down the page. The right side of the page was created by mixing green re-inker into gel medium and then applying the gel medium to the page over a Mini Circle Grid Crafter’s Workshop Template.

The gears were first inked on one side with alcohol ink and then ran through an embossing machine. Then, on the side that had not been inked, I applied a layer of StazOn to the raised portion. A bit of punchinella and fabric was added to finish the page.


While I was playing with the acrylic pages, I discovered a fun splatter technique using alcohol inks. I squeezed a couple drops of alcohol ink onto my craft mat and then added in a small amount of blending solution. Mix the two together with a paint brush, and then flick the ink mixture onto the page. The blending solution slows the drying time on the alcohol ink, giving just enough time to make a splattered “mess”.


For the background on the next page, apply a thin layer of gesso over a Circle Grid Crafter’s Workshop template and allow the gesso to dry completely. Then apply your favorite colors of ink to the page. Then, using the same template and a Pure Orange Zig Writer, trace circles over the entire page. The dress form was created by covering the bodice with paper and then a layer of Stickles was applied on top of the paper. The skirt was created by layering on a ruffeled trim. The stand was heat embossed with WOW embossing powders.


To start with the canvas page, apply your favorite colors of spray inks to thoroughly saturate the canvas and allow the dry. Then, using a permanent black ink, stencil over a Henna Hands Crafter’s Workshop template. The stars were created using the Punchinella Crafter’s Workshop template and Iridescent Medium. The circles were created using white paint and a dry bruch technique.


The last page is a fun one! But……you’ll just have to come back tomorrow for a full tutorial on how this beauty was created.

Friday, February 10, 2012

Teck-Neek Paluza Album Part 1

Boy do I have a fun album to share with you over the next couple days! This was one of my albums that was at CHA last week.

The Timeless Tabs Album is hands down my favorite album in the Basically Bare line because of the size of the album and because of the different mediums in the album.


The album cover was created by covering the entire page with Ranger’s Tissue Tape and then applying a thin layer of gel medium to ensure it was well adhered to the page. Then, I just randomly applied ink to the page. The top right and bottom left corners were then covered with a layer of Glass Bead Gel Medium, which makes the ink colors underneath pop. Next up, I painted on a thin layer of gesso and then stenciled the title on top once it was dry. Lastly, I used an acrylic button and heat embossed it. The heat embossing caused the acrylic to warp and curl, which is exactly what I wanted it to do.


The first step in creating this next page is to paint the entire page with blue acrylic paint and allow it to dry. Then give it a light spritz with Yellow Daisy Glimmer Mist. Using the Crafter’s Workshop Mini Clouds template and a White Zig Posterman Extra Fine tip pen, trace the shape of the clouds. Next, fill in the cloud shapes with Picket Fence Distress Stain. Give each cloud a spritz of water and watch as your page appears to begin “raining”.

Now, on to the bottom half of the page. Adhere the brick pieces from the Climbing Ivy Set to the page. Then, apply a layer of gesso over the brick pieces, being sure to fill in the spaces between the bricks. While the gesso is still wet, sprinkle embossing powder onto the bricks. I used five different colors to create the brick effect. Once the gesso is dry, melt the embossing powders with a heat tool.

The “egg” was created using the Holiday Ornaments Set. I inked the edges of the felt with a Yellow Zig Fabricolor pen and then added the eyelets for a bit of texture. The bird was heat embossed with two different colors of WOW embossing powders.


Ready for the next page? I started by stamping the front of both pages. The gears were all heat embossed with WOW embossing powders.


I used the Paparazzi Set on the back of the page. Both pieces were also embossed with WOW powders.


This page was started by laying down several colors of water based ink to cover the page (use your favorite brands of ink). Then I stamped the page with a couple of my favorite stamps. Next, lay the Mini Trust Your Heart Crafter’s Workshop template down on the bottom corner of the page and completely cover with a thin layer gesso. Allow the gesso to sit for a minute or two and then scrape it off the page and remove the template. Removing the gesso creates a resist on the page.

Next up, ink a couple of canvas hearts and adhere to the page.

That’s it for today! Join me again tomorrow for another dose of technique heavy pages.

Saturday, February 4, 2012

Trio of ATC's

Today I have three ATC's to share. The background on the first two are similar, but after that they are uniquely their own.

The background was made with watercolor paper and watercolor inks. I made a recent discover at Dick Blick Art Supplies - they have a set of watercolor inks that are just eye popping with color! You can see below how intense the colors are. Love, love, love the color!


For the first ATC, I simply stamped the background with Distress Inks and then stamped the foreground with a permanent ink. Super simple.


For the second ATC, I stamped the wing on cardstock, colored the image, and then adhered it to the ATC. Then I stamped the wings in both the top right corner and the bottom left corner. Lastly, I added the sentiment and a bit of Crackle Accents to the heart.


For my last ATC, the background was covered with Ranger's Tissue Tape and then inked with Distress Ink. Then I stamped the corset on a separate piece of cardstock, colored it in, and then cut it out. Then, I punched holes and added the ribbon to mimic a corset lacing. Lastly, I just adhered the corset to the ATC.
Related Posts with Thumbnails