Monday, September 27, 2010

Layouts of the munchkins

All of these were in the August issue of Scrapbook News and Review Magazine. Hope you enjoy!

Yes, I know I said layouts of the munchkins and this first one has nothing at all to do with the kidlets. But it's most definitely a fun one that must be shared with the world. This is the bride and groom's cakes I did for a wedding last October. Love, love, love the cannibal cake!


This next one is of my nephew on Christmas Eve morning last year. He had lost a tooth and I wanted a picture of course. So here's the conversation - Felix can I have a picture? No. Felix can I have a picture please? No. Yes, we are both stubborn. After pestering him for a bit, this was the resulting picture.


On to the smallest kidlets. Emily and Sheyla with my sister. They were 10 months old here.


This one was taken the day the twins were born. They were four weeks early but 100% healthy.

Lastly, a layout of Emily on Christmas morning. She latched onto that doll and wouldn't let go for the rest of the day.

Friday, September 24, 2010

Fall Tag

Yesterday was my day at Scrapbook News and Review to show off my take on a fall tag. Hope you enjoy!


Cut white cardstock to 6 1/4 in by 3 1/8 in. Cut assorted color carstock to 3/4 in x 3/4 in and ink around the edges. Adhere the cardstock squares to tag and set tag aside.


Cut a 2 1/2 in x 2 1/2 in piece of cardstock and cover the entire piece with a thin layer of modelling paste. Allow to dry for 2-3 minutes. Note - the modelling paste will not be completely dry so take caution when handling so as not to displace the modelling paste.


Using a mister filled with water, spritz your selected stamp and stamp firmly into the modelling paste. The water will act as a resist and allow a clean stamped image without having the modelling paste stick to the stamp. Set aside to completely dry (overnight is ideal).


Stamp sentiment and cut out.


Once the carstock piece with modelling paste is completely dry, add color with distress ink.


To add a bit of shimmer, make a small pool of water, add a bit of perfect pearls, and mix together. Paint the slurry onto the stamped piece.


Attach stamped image, sentiment, and add ribbon.

Friday, September 17, 2010

Mixed Media Items

Once again, just sharing a few more items in the July issue of Scrapbook News and Review Magazine. This week I have a tag and a couple of ATC's.

The tag was my take on the 4th of July celebration.

And then I have a couple of ATC's. The first one shows lots of inking, stamping, and distressing and the second was simply fun and whimsical.


Enjoy and have a wonderful weekend!

Friday, September 10, 2010

Cards Galore

These are just a few of my favorite cards that were in the July issue of Scrapbook News and Review Magazine.

All the stars on this one just made a fun card.

And anything with bling is a contender to be a fave!

This one is my personal favorite! I love how the background turned out and all it took was a few colors of alcohol ink and a piece of glossy cardstock.

Have a great weekend everyone!

Friday, September 3, 2010

Layouts of Tybee

Time once again to share some layouts. All of these were in the July issue of Scrapbook News and Review Magazine. All of the layouts are from a trip to Tybee Island last year.

This one is of my niece who told me in her best grown-up impersonation "Don't take any pictures of me sleeping". What else could I do but get pictures?


This is from one evening where everyone took a walk on the beach and the kids were gathering sea shells.


Lastly, this was from the wedding we attended that weekend. Big thanks to Liz for letting me use her daughter's pictures in my layout. Isn't she adorable? My fave pic is the top one with her just staring at the cake so completely mesmerized.


Hope you've enjoyed these layouts and they bring you some inspiration for your own creations!

Friday, August 27, 2010

Lots of cards

Just sharing a few more of my cards and ATC's that were in the June issue of Scrapbook News and Review Magazine.


Friday, August 20, 2010

Altered Clock

Who would have thought that when I started submitting items to Scrapbook News and Review Magazine that I would have been asked to join the staff? And that I would still be there a year and a half later? Of course, I'm lovin' every minute of it and learning so much along the way.

A few months ago I got my hands on a stack of clearance Prima Paintables watercolor papers. One of the sheets was just begging to be turned into a clock. Who was I to say no? LOL So I grabbed my Prismacolor watercolor pencils and my aqua pen and got busy coloring. Next, I painted the frame a dark blue and added some yummy Prima crystals, flowers, and butterfly. Then I just stamped the clock numbers and added the clock mechanism. The one thing that doesn't show up in the picture is the shimmer all the pieces have thanks to a dose of Perfect Pearls.


When I first started working on the clock, my intention was for it to be a Christmas gift. Now that it's finished though, it might just find a permanent home in my scrap room.

Sunday, August 15, 2010

More Layouts To Share

This first layout is from a trip to Stone Mountain last summer. As you can see from the pictures, the view from atop the mountain is absolutely amazing.


Little miss Emily sleeping. Even in her sleep she has the cutest little grin on her face.

Sunday, August 8, 2010

Flashback to the 70's

Let's take a magic carpet ride on a trip back to the groovy 70's. Both of these layouts are me, the first in 1976 and the second in 1979. Who could forget the shag carpet, gold linoleum, and fake wood paneling?


Sunday, August 1, 2010

Cards, cards, and more cards

Thought I would share a few cards with everyone. As I was uploading these, I noticed a similarity - every card has just a touch of bling. OK, some more than a touch, but if it glimmers and shines it certainly can't be a bad thing.


All of these were in the June issue of Scrapbook News and Review Magazine. The July issue is up so head on over and take a look!

Wednesday, June 30, 2010

Summer Tag

Day 10 of Scrapbook News and Review Magazines Summer Tags is completely representative of what summer is like here in the south - H..O..T! There are just a few short steps to make this tag.

Cut cardstock and patterned paper to size. Adhere patterned paper to cardstock and use punch to round the corners.

Using Distress Ink, apply ink over mask.

Stamp images onto watercolor paper and then heat emboss. Color images with watercolor pencils and an aqua pen.

Cut out stamped images. Adhere sun to upper left hand corner and popsicle to lower right hand corner.

Adhere glitter to letters and set aside to dry.

Make holes across the bottom of tag using paper piercer. Attach beads to jump rings then attach jump rings to bottom of tag.

The trick to using jump rings is to open them correctly. The one on the left shows the correct way to open them and the one on the right is the incorrect way. By pulling the sides apart (as in the jump ring on the right), the jump ring will never close properly. The best way to open jump rings is by using two pairs of beading or needle nose pliers. Grasp each side of the jump ring with a pair of pliers and pull one side towards your body and the push the other side backwards away from your body. And to close it, just do the exact opposite by pulling both sides back together.

The completed tag.

Head on over to Scrapbook News and Review Magazine to check out the other nine days of Summer Tags. The gals did a wonderful job!

Sunday, June 27, 2010

Weekend Creations

My oldest niece is spending the weekend with me and the first thing she always wants to do is make something. So I let her pick through a few items I had and she decided on the wall plaque. She did almost all the work herself - she picked out the stamp she wanted to use, colored in the image, picked out the patterned paper, painted the wood plaque. The only thing I helped her with was cutting out the stamped image and cutting the patterned paper. I think she is well on her way to being completely hooked on paper crafting. :)


We also went to see Toy Story 3 in 3D yesterday. Definitely worth the money to see this one in theatres. There was a spot near the end that had me in tears and the very end of the movie is so wonderfully sweet. I think next on my to see list is Shrek.

Sunday, June 20, 2010

A Few Creations To Share

I'm always anxiously waiting on the next issue of Scrapbook News and Review Magazine to be posted for two reasons - 1) so I can share my goodies from the prior month and 2) there's always plenty of new projects and articles to look through.

The two layouts are from a friend's wedding last October on Tybee Island. I made both the bride and groom's cakes and apparently the bride had her own ideas on how to cut the cake (notice her hand with the cake knife in a stabbing position).


This layout is from her wedding shower at work. And what a fun drive home it was with a car full of balloons.


This was my fave card for the May issue of the magazine. Bling, butterflies, and flowers - a perfect combination.


The June issue of the magazine has been published so head on over and take a look. If you would like to see my other creations from the May issue, they are all posted on my online gallery here.

Tuesday, June 15, 2010

Fun Day in Atlanta

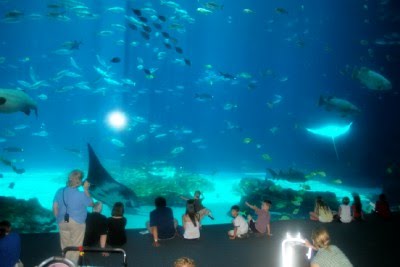
The entire day yesterday was spent in Atlanta. First, we went to the Georgia Aquarium. Then we walked next door and went to the World of Coke. The aquarium was awesome. So many creatures that most of us would never see up close and personal if it weren't for exhibits like this. There was an open tank were you could touch small sharks and sting rays. The shark feels like velvet. There were other open areas where you could touch sea anemone and starfish. This is one larger viewing areas. There were manta rays, sharks, giant grouper, and tons of other little fish.


This is from a walk through tunnel where the creatures are literally swimming around you. Amazing close-up views of the animals.


How cute is this guy? The otters were really fun to watch.


Over at the World of Coke, there was tons of Coke memorabilia and we got to taste different drinks from around the world.
Related Posts with Thumbnails