Monday, May 27, 2013

Star Frame

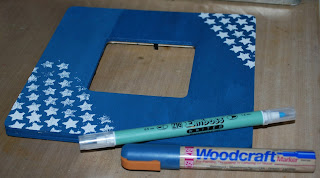
Are you ready for another fun project?   Good, because today I have an altered frame using Basically Bare felt and chipboard and Zig pens and markers. I can already picture adding in an adorable baby picture on this frame.


To start, I painted the entire frame using a Zig Woodcraft marker in Bluebell.  Once the paint was dry, I used a star stencil and my Zig Emboss Writer to make the star shapes.  Then I quickly covered the stars with white embossing powder and then heat embossed the stars.


Next up, I added a couple of felt clouds and a chipboard moon.  The moon was painted with a White Zig Painty FX marker.  Then, when the paint was dry, I covered the moon with a layer of glue from my Zig 2 Way glue Pen and then covered it with clear glitter.  Every project of mine has to have a bit of shimmer and shine.


Next up, I simply added a sentiment sticker and outlined it with a White Zig Chalk Writer.


Simply adorable, but maybe I'm a bit biased :)


Thanks for stopping in today!

Monday, May 20, 2013

Out Of This World

Welcome back!  Today I have a super fun card made using tons of Kuretake inks and Basically Bare chipboard and acrylic.  


Wondering how this card was made?  Well, lets get started and I'll show you.  I started with a 4x6 piece of glossy cardstock.  Using a star stencil and my Zig Emboss Writer, I covered the cardstock with stars.  Then I covered the stars with clear embossing powder and heat embossed the cardstock.


Next, I inked the entire piece of cardstock with Cornflower Blue Kurecolor Ink. The heat embossing on the cardstock will resist the ink, creating a fun background effect.


Next, I splattered a bit of Orange Kurecolor Ink to add another layer of color to the background.


Now, on to the embellishments.  I used my Zig Emboss Writer again to cover the chipboard moon. Then I heat embossed the moon with Wow silver glitter embossing powder. Lastly, I ran it through my Cuttlebug to add a bit more texture.


And with keeping with the same colors, I used my Orange Kurecolor Ink on a couple of acrylic stars.


Now to layer everything together.  I simply punched a couple of holes in the moon and then attached it to the card with a bit sheer white ribbon.  Next I adhered the stars, and then added a few sentiment stickers.


Thanks for stopping in today!

Monday, May 13, 2013

Bright and Colorful

Hmmm…several posts in a row…I might just be getting back into a regular blogging rhythm again J  Today I have a few more projects from the October issue of Scrapbook News and Review Magazine.


First up is a fun tea cup shaped card.  And it was super simple to make.  Layers of patterned paper, a bit of lace, felt wings and a canvas heart from Basically Bare.  The heart was heat embossed with WOW embossing powders and the wings were colored with Glimmer Mist.


Next up is a card perfect for that special someone in your life.  I started with black cardstock for the background then added a bit of musical inspried patterned paper.  Then a bit of May Arts ribbon that was inked blue and flower from Petaloo that was also inked blue.  Lastly, I cut out a piece of patterned paper in the shape of a heart and inked the edges a bright pink so it would contrast with the blue. 


And lastly, I have an adorable tag. Layers and layers of patterned paper.  Lots of stamping on the background.  And the focal point of the tag is a stamped imaged from Queen Kat Designs that is colored with Prismacolor pencils.  With colors from the Spring spectrum, it would make the perfect addition to a gift.

Thanks for stopping in today!

Monday, May 6, 2013

Family Fun

Welcome back!  Today I have three fun layouts that feature my my adorable nieces and nephew.  All three layouts were in the October issue of Scrapbook News and Review Magazine.


First up is a layout that features my twin nieces from their first visit to the ocean, specifically Tybee Island beach.  They had a blast!  The layout itself was made with a Fancy Pants transparency that I found in my stash.  I then just used some white paint to frame the picture, added a bit of trim, and a word ticket for the sentiment.


Next up is a 6 x 12 layout featuring my three year old (at the time) twin nieces.  They were just showing off one day as we were out shopping.  The camera is from Basically Bare and was heat embossed.  I then added a bit of Stickles for the flash and then covered the center with Glossy Accents.


And lastly, I have a layout that features my nephew sleeping soundly on our drive out to Tybee Island last September.  As soon as we hit the interstate, he was out.  I used a bit of paint to distress the background, added a bit of punchinella, then added on a chipboard gear.  The gear is from Basically Bare and was heat embossed with several colors of WOW embossing powders.

As you can see, the kids provide lots and lots of photo ops for me.  Thanks for stopping in today!


Related Posts with Thumbnails