Showing posts with label JnW Crafts. Show all posts

Monday, December 8, 2014

Peace Tile

Can you believer we're only about two and a half weeks away from the big day? Reality has finally set in for me, so now I'm trying to pick up the last few gifts and get my house ready for all my family and friends.

Part of getting the house ready is the decorations, and this 12in x 12in altered tile is the perfect addition to my decorations.


I started with painting the entire tile with a light blue and white acrylic paint.


Once the paint was dry, I rub on a design adhesive strip then layer on the silver and blue glitter.


Next, I paint a JnW Crafts cross with a silver paint pen and added a few dots of Stickles, then adhere it to the tile.


To finish up the winter scene, I add on a bit of Snow-Tex and set the tile aside to dry.


To finish the tile, I added a bit of trim and the sentiment.


Nestled amongst all of my snowmen, this tile will add to wintery feel.

Monday, December 1, 2014

Corset Photo Clip

It's the first of the month again, which means it's time for a new challenge from Scrap It Girl. The theme for December is wrap it up. I chose to wrap my clip with lots of twine.

I'm getting in the holiday mood, and what better to help with this than a fun Christmas project. For this photo clip, I used the JnW Crafts corset.


I painted the clip white, gave it a spritz of glimmer spray because everything needs a bitter of shimmer. then I just wrapped it a few times with some twine, added a couple of die-cut leaf sprigs, then added the sentiment.

The corset was painted with acrylic paint, then I added the ribbon binding, then lastly added a bit of Snowtex around the top. Super simple.


I can picture this sitting on my mantle with pictures of Christmas past. I can also see giving this away as a wonderful gift.

Tuesday, October 28, 2014

Boo Candle

We're just a few days away from that spookiest of nights, so what better time to show off a fun home decor item? I used the ornament template from JnW Crafts to create the jack-o-lanterns.


To start, I used the ornament template and felt to make the jack-o-lanterns. Then i used a brown marker to give them a few highlights. Lastly, I cut out some eyes from black felt and added the letter stickers.


 Now on to the candle. I wrapped it with some burlap, then added a strip of tulle. Next, I added a felt owl.


Now I just layered the jack-o-lanterns on top of the candle,and voila, project complete.


How cute would this be as a part of a centerpiece on a table of sitting on top of a mantle?

Wednesday, October 1, 2014

Boo to You!

It's the beginning of a new month, which means it's time for a new challenge at Scrap It Girl. This month's challenge is all about embossing folders. With Halloween just around the corner, it's the perfect time to make a spooktacular card.


And it was super quick to make too! I just ran my cardstock through my embossing machine using a web embossing folder. Then I used a bit of black and orange ink to make the web design pop.


To make the spider, I started with four strips of wire, wrapped them together, bent the ends for feet, then painted it black.


I used my JnW Crafts ornament template and some orange felt to make the spider.


Now it's just a matter of putting the spider together. Of course I added a couple of googly eyes.


To finish the card, I added some dimensional paint drops to the spider and a sentiment.


Tuesday, September 9, 2014

Blast Off!!!

It's the start of a new week, and it's also time to show off another project! This card uses our wood rocket ship embellishment


The card was actually pretty quick to make too! I started with a kraft cardstock base, then added a layer of red and white cardstock on top. Now the fun part begins. I took another piece of white cardstock and created layers of clouds using blue ink and a homemade mask.

Then I used silver alcohol ink and colored the rocket ship. The "flames" are simply strips of cardstock that I wrapped around a pencil to make them curl. The blue dots or simply heavy duty foil that have been run through a Cuttlebug with an embossing folder then punched out.

Lastly, I just added my sentiment.  Easy peasy right?

Monday, August 18, 2014

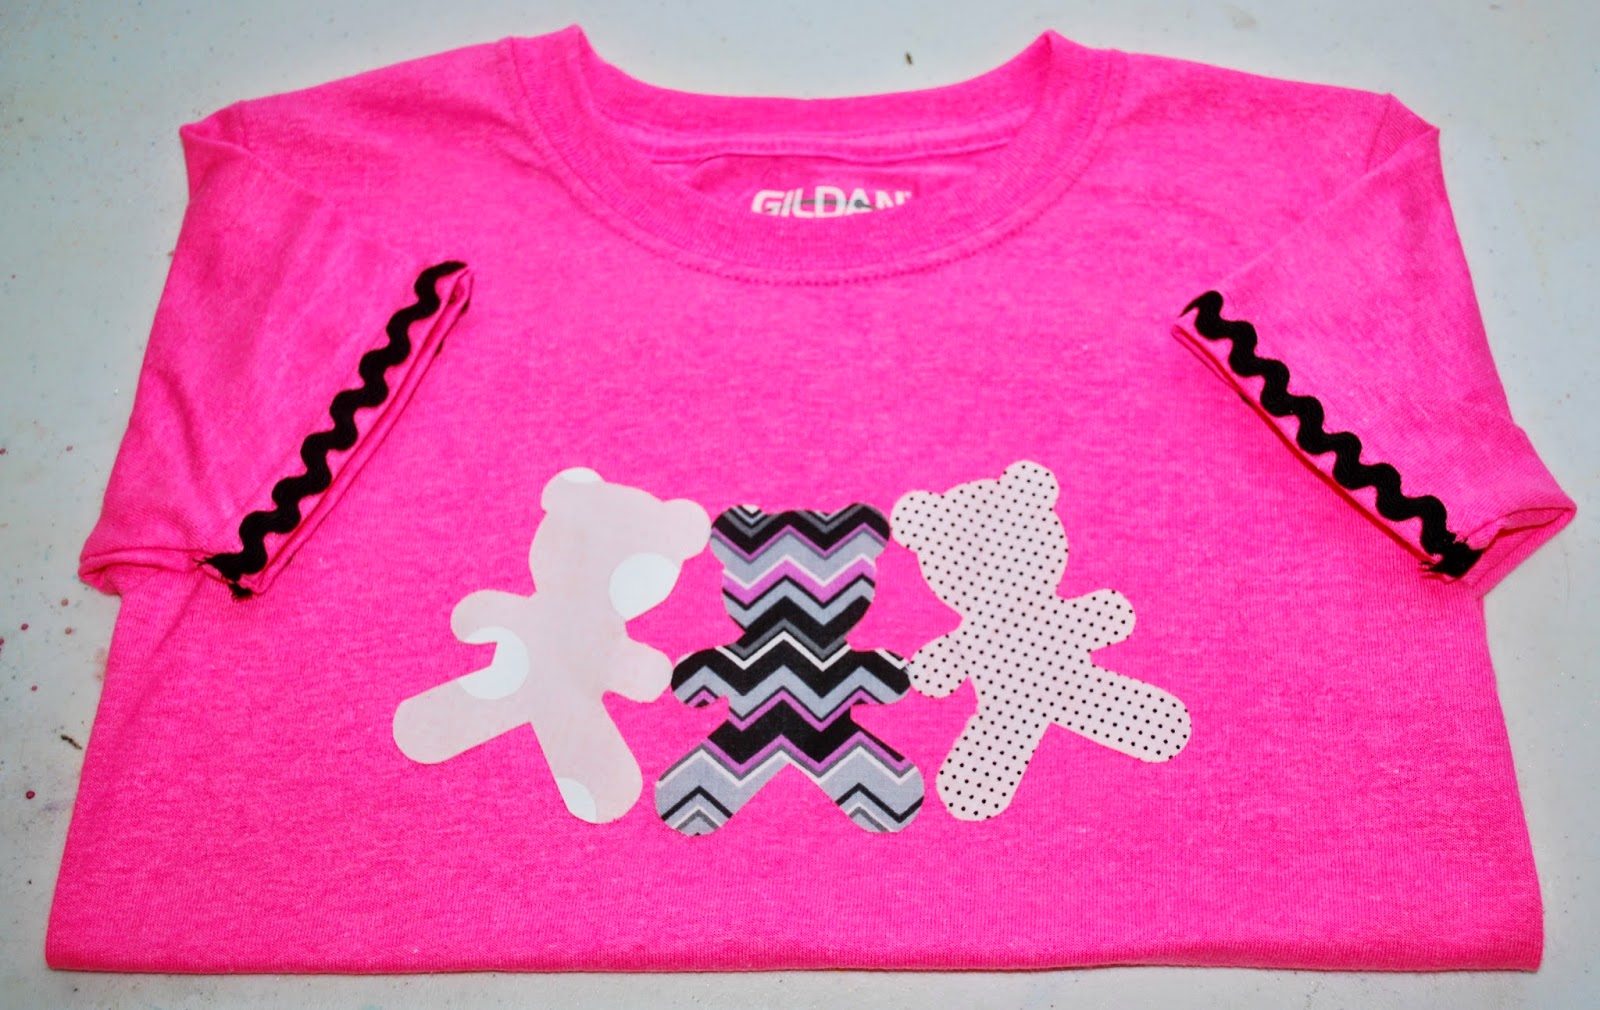
Teddy Bear T-shirt

Welcome back everyone! Today I have something a bit different for me - a t-shirt. Yes, I'm playing with fabric and clothing....and my JnW Crafts Teddy Bear template. A project where I didn't touch my ink pads lol. Might just be a first for me.

Let's jump right into how it was made.

I chose three different patterns of fabrics, cut to 4 in x 6 in each.


In addition to the fabric, I also cut three pieces of fusible web to 4 in x 6 in.  If you didn't know, this gal does not sew! :) I simply followed the directions on fusible web package. The one I was using had a paper back that was removed, then I pressed the fusible web to the wrong side of my fabric. I then used my JnW Crafts template to draw my teddy bear design.


Next, I cut out the three teddy bears. I removed the backing from the other side of my fusible web then ironed on the cut-outs to my t-shirt.


To add a bit more color to the shirt, I hand sewed on a bit of ric-rac trim to the sleeves.  Start to finish, it took about 30 minutes to finish the t-shirt. Which is a good thing because I had to make a second one ASAP. Perils of having twins in the family is that you must have two of everything :)


I hope you've enjoyed your visit today!

Friday, August 1, 2014

Altered Storage Jar

It's the first of the month, which means it's time for a new challenge at Scrap It Girl. The challenge for August is to use arrows. I had fun with this challenge, creating an altered jar to hold my paint brushes. 


I started by simply wrapping a jar with bakers twine.


Next, I painted a chipboard arrow with white acrylic paint, then drew an outline with a black Zig Millennium pen.


Next up, I inked the back of an acrylic text bubble embellishment from JnW Crafts with white StazOn. Next, I colored the edges with a black Sharpie. Then I stamped the sentiment with black StazOn ink.


Once the ink was dry on the acrylic embellishment, I adhered both the arrow and the text bubble to the jar, then added a few flowers on top.


To finish the jar, I added a few drops of Stickles to the flower centers and then added a mini light bulb.


This will make a wonderful, decorative addition to my shelves. And a much prettier way to store my paint brushes. You could also use this jar to store your colored pencils and markers too.


Thanks for stopping by!

Monday, July 28, 2014

I Love You Wall Plaque

Welcome back friends! Let's jump right on in with today's project. Today I have a project made using the flower template from JnW Crafts.


Ready to see how it was made?


 I started by layering patterned paper on a 6 inch plaque. Then, using the flower template, I cut out individual flower petals from two different designs of patterned paper. Then I simply layered the flower petals around the outer edge of the plaque.


Next, I added a bit of ribbon.  Don't worry that the circle of ribbon is not perfectly round.  It will be covered with all sorts of embellishments later.


Next, I curled the edges of all the flower petals.  This as a quick process. I just took a dowel rod and curled the edges of the paper around it for a few seconds.


Lastly, I added on lots of flowers, lots of bling, mini playing cards, a butterfly, and a heart.


A beautiful project just ready for giving as a gift or to keep and brighten your own home.
Related Posts with Thumbnails