Monday, September 23, 2013

Baby Boy Wall Hanging

Welcome back!  I sat down a few days ago to make something for a friends upcoming baby shower.  And wouldn't you know it, a case of scrapper's block.  Happens to the best of us, right?  Took me quite a bit longer than I expected, but I think the end product turned out just fine.


So let's get started on how this adorable wall hanging was created.  I started with a piece of acrylic which I colored with Kurecolor Ink in Dull Blue.


Next, I outlined the edges of the acrylic with a Painty FX pen in white.  Set the acrylic page aside for a couple minutes at this point to let the paint dry.


Next up, I created some background texture.  I added a piece of Punchinella, some doilies, baker's twine, and letter beads. Easy peasy so far, right?


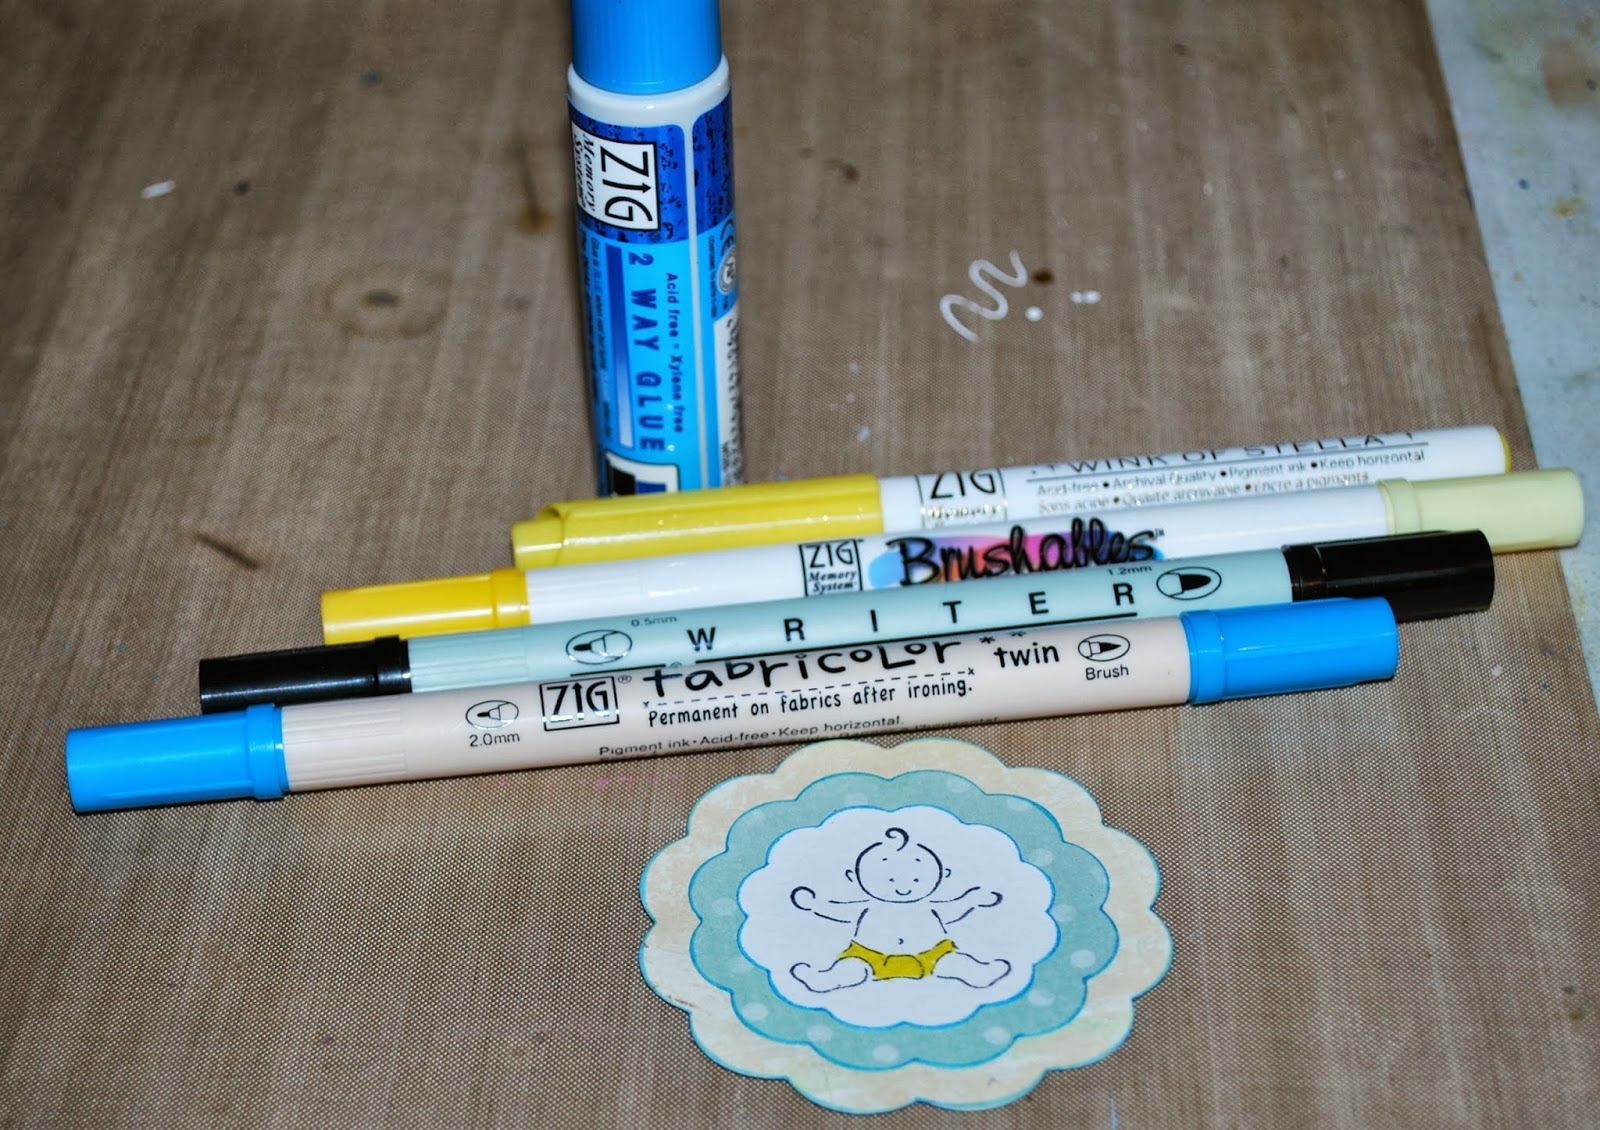
Then I simply stamped a baby image on white cardstock and colored the diaper with my Zig Brushables pen in Pure Yellow.  Then, to add just a bit of glimmer, I went over the yellow with a Wink of Stella pen in Glitter Yellow. I outlined the edges of the cardstock with a Fabricolor pen in Cobalt Blue. Then I adhered the layers of cardstock and patterned paper together using my Zig 2 Way Glue pen.


Now, it's just a matter of adding the finishing touches. I attached the stamped piece using a mini clothes pin.  Lastly, I added some flowers, a butterfly charm, and some ribbon so the piece can be hung.


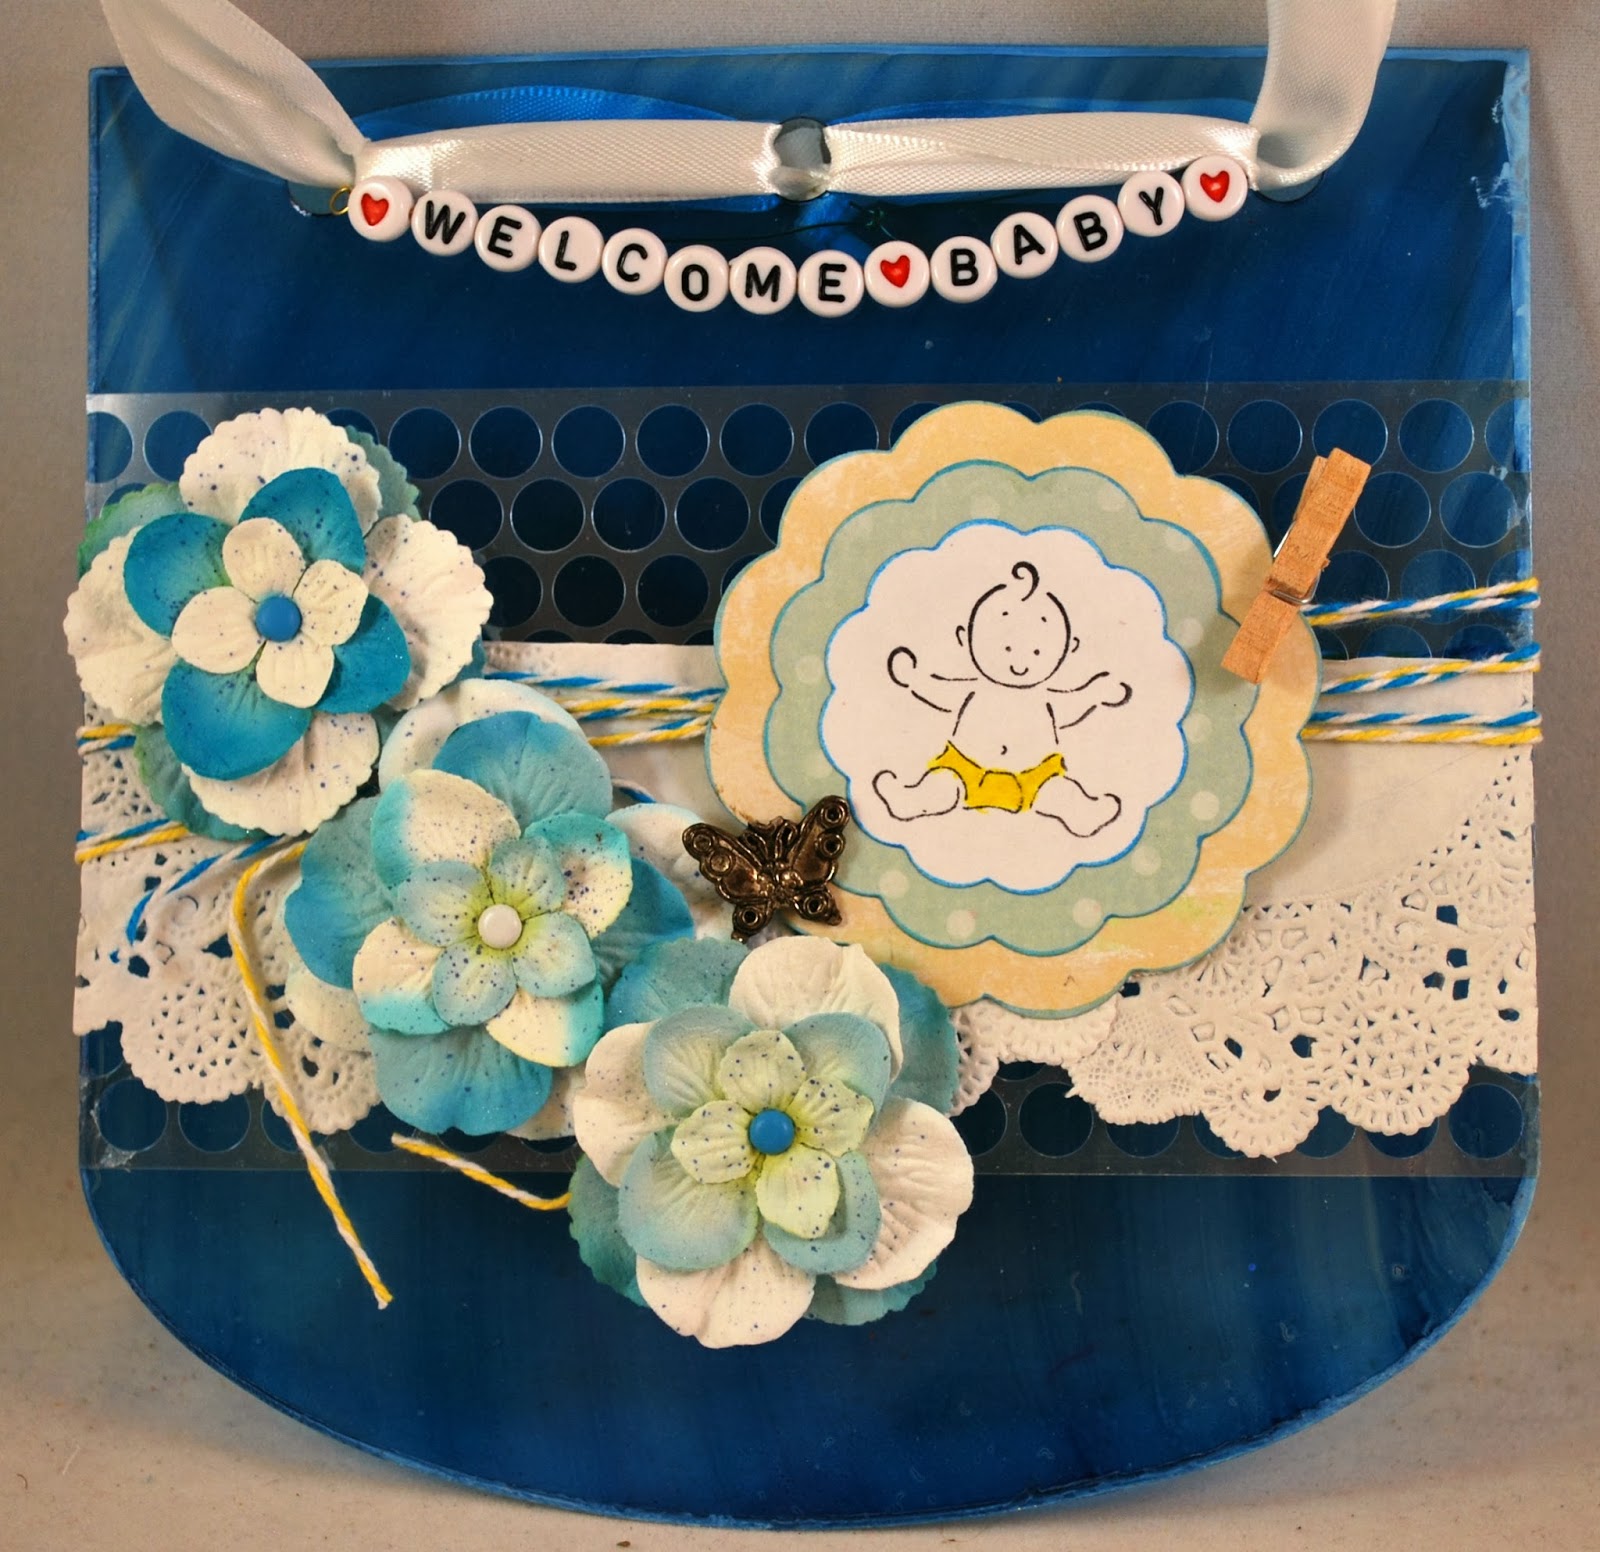
So now you have an adorable addition to a baby shower gift.

Supplies:
Acrylic: Basically Bare
Flowers: Prima
Punchinella: Gauche Alchemy
Inks and pens: Kuretake

Monday, August 26, 2013

Altered Tile

Hard to believe it's been two months since I've posted anything.  Let's just say that life has been super crazy lately.  A few highlights - in June I decided that the best thing for my health was to slice off the tip of my right pinky finger while cooking dinner.  No worries thought, the finger is fully functional and still healing, just a bit lopsided.  July I took a well need vacation to the beach with my family. And August has just been busy with work and life.  Anyway....on to a fun project.  I really had a lot of fun with this one.

Several months ago, I bought several stone tiles with the intent of altering them.  The inspiration for the alterations was just never there.  Well, I sat down this past weekend, pulled out my Zig Painty pens, and went to town.  Love, love, love how this turned out.  So lets's get started on how I pulled this one together.


First, I used four different colors of Zig Painty FX pens - Lt Blue, Yellow, Green, and Pink.  


I simply added and layered each color until I was happy.  A note when painting stone tile - it it very porous and will quickly soak up the paint.  There is hardly any time at all to move and blend the colors, so work quickly.


Next, I added a very thin layer of white using a White Painy FX pen to tone down the bright colors. Then I added a few highlights with a Pink Painty FX pen.


Once the paint has fully dried, I used a Zig Writer in Pure Black to draw a flower and add a few highlights.  If you're anything like me and usually not happy with the first thing you draw, you can use a pencil and lightly draw your image first, then go over it with the marker.  This way, if there are any mistakes, it can be erased before its drawn in with permanent ink.


For the next step, I added a bit of detail using a Zig Opaque Writer in Arctic White.  I simply doodled a scalloped line around the edges of the flower.


For the last bit of detail, I used a Zig Fabricolor pen in Gold.  I simply added a few dots to the center of the flower.


for the next step, I set the tile aside and grabbed a chipboard butterfly.  I colored it entirely using a gold Fabricolor pen, the added a few details using a Writer in Black.


Now, it's just a matter of adding the finishing touches.  I added a Petaloo flower in the corner, added the butterfly, and added a few Ranger sentiment stickers.


This really could not have been any easier to put together.  All I used was eight different pens, a tile, and a couple of embellishments. Now I have a wonderful display piece for my home, or maybe even a gift for a friend.

Monday, June 17, 2013

Fun in Savannah

Welcome back!  Today I have a few projects from the November issue of Scrapbook News and Review Magazine.  


Both of the layouts feature pictures from a trip to Tybee Island and Savannah from last September.  It really is one of my favorite places to visit.


The first layout is a really quick and simple page.  A bit of May Arts ribbon, a few chipboard embellishments, and voila…instant layout!  The second layout is almost just as simple.  I started with my background, flicked on a bit of ink for a splotchy effect, added a few die-cuts, a bit of fabric, a few chipboard stars covered with Perfect Pearls…again fairly quick and easy.


Last up is an adorable card set.  Butterflies are one of my favorite embellishments to use, and this set is no exception.  I simply punched out a bunch of butterflies, layered them, added a bit of Stickles, and then added them to the cards, along with a bit of May Arts ribbon and a stamped sentiment.

Monday, June 10, 2013

Cards Galore!

Today I have another set of super fun cards to share, all of which were featured in the November issue of Scrapbook News and Review Magazine.


This first card I had a lot of fun creating.  I used my Spellbinders die to cut out the middle portion from my patterned paper.  Then I added a a piece of transparency into the space that was cut out.  Next, I stamped the sentiment on the transparency, layered on a few flowers, a chipboard butterfly, and a piece of lace.  I love the look of being able to see straight into the card.


My second card would be perfect for a wedding or bridal shower.  I simply layered on my patterned papers, added a crystal flourish, and a few dimensional flowers. Super quick and simple.


Lastly is a fun, colorful card.  I started with my background paper, layered on a few die-cut papers on top, then finished the card with a stamped image from Queen Kat Designs which was colored with Zig markers. The last finishing touches on this card is a bit of glitter around the die-cut and a bit of ribbon.

Monday, June 3, 2013

Celebrating Your Graduation

It's that time of year again when thousands of teenagers and young adults will be graduating high school or college and starting a new chapter in their lives.  So what better way to help celebrate the momentous occasion than with a fun card?  


To start, lets gather the supplies we'll need to make this card.  You'll need cardstock, patterned paper, your selected stamps, and the following Zig pens: Art & Graphic Twins, Writer, 2 Way Glue, and a Medium tip Waterbrush.

I used the Waterbrush and the Art &Graphic Twin markers to color the balloons and hedgehog.  I simply touched the end of the Waterbrush to the brush tip of the Art & Graphic Twin markers to pick up the ink, the simply layered the ink onto the stamped image. I then used the fine tip of the brown Art & Graphic Twin marker to create the highlights on the hedgehog.

Then I used my 2 Way Glue Fine Ball Point pen to fill in the hearts on the balloons. I then covered the glue with glitter and set the piece aside to dry.


While the glue was drying, I started on the background of the card. Just a few simply layers of patterned paper with the edges distressed.


Next, I stamped my sentiment with a Black Zig Writer.


How cute is this finished card?!  And did you notice the tiny diploma in its hand?  I just used a scrap piece of  paper, rolled it up, and tied it with a piece of thread.


Congratulations to all of the this years graduates!

Monday, May 27, 2013

Star Frame

Are you ready for another fun project?   Good, because today I have an altered frame using Basically Bare felt and chipboard and Zig pens and markers. I can already picture adding in an adorable baby picture on this frame.


To start, I painted the entire frame using a Zig Woodcraft marker in Bluebell.  Once the paint was dry, I used a star stencil and my Zig Emboss Writer to make the star shapes.  Then I quickly covered the stars with white embossing powder and then heat embossed the stars.


Next up, I added a couple of felt clouds and a chipboard moon.  The moon was painted with a White Zig Painty FX marker.  Then, when the paint was dry, I covered the moon with a layer of glue from my Zig 2 Way glue Pen and then covered it with clear glitter.  Every project of mine has to have a bit of shimmer and shine.


Next up, I simply added a sentiment sticker and outlined it with a White Zig Chalk Writer.


Simply adorable, but maybe I'm a bit biased :)


Thanks for stopping in today!

Monday, May 20, 2013

Out Of This World

Welcome back!  Today I have a super fun card made using tons of Kuretake inks and Basically Bare chipboard and acrylic.  


Wondering how this card was made?  Well, lets get started and I'll show you.  I started with a 4x6 piece of glossy cardstock.  Using a star stencil and my Zig Emboss Writer, I covered the cardstock with stars.  Then I covered the stars with clear embossing powder and heat embossed the cardstock.


Next, I inked the entire piece of cardstock with Cornflower Blue Kurecolor Ink. The heat embossing on the cardstock will resist the ink, creating a fun background effect.


Next, I splattered a bit of Orange Kurecolor Ink to add another layer of color to the background.


Now, on to the embellishments.  I used my Zig Emboss Writer again to cover the chipboard moon. Then I heat embossed the moon with Wow silver glitter embossing powder. Lastly, I ran it through my Cuttlebug to add a bit more texture.


And with keeping with the same colors, I used my Orange Kurecolor Ink on a couple of acrylic stars.


Now to layer everything together.  I simply punched a couple of holes in the moon and then attached it to the card with a bit sheer white ribbon.  Next I adhered the stars, and then added a few sentiment stickers.


Thanks for stopping in today!

Monday, May 13, 2013

Bright and Colorful

Hmmm…several posts in a row…I might just be getting back into a regular blogging rhythm again J  Today I have a few more projects from the October issue of Scrapbook News and Review Magazine.


First up is a fun tea cup shaped card.  And it was super simple to make.  Layers of patterned paper, a bit of lace, felt wings and a canvas heart from Basically Bare.  The heart was heat embossed with WOW embossing powders and the wings were colored with Glimmer Mist.


Next up is a card perfect for that special someone in your life.  I started with black cardstock for the background then added a bit of musical inspried patterned paper.  Then a bit of May Arts ribbon that was inked blue and flower from Petaloo that was also inked blue.  Lastly, I cut out a piece of patterned paper in the shape of a heart and inked the edges a bright pink so it would contrast with the blue. 


And lastly, I have an adorable tag. Layers and layers of patterned paper.  Lots of stamping on the background.  And the focal point of the tag is a stamped imaged from Queen Kat Designs that is colored with Prismacolor pencils.  With colors from the Spring spectrum, it would make the perfect addition to a gift.

Thanks for stopping in today!

Monday, May 6, 2013

Family Fun

Welcome back!  Today I have three fun layouts that feature my my adorable nieces and nephew.  All three layouts were in the October issue of Scrapbook News and Review Magazine.


First up is a layout that features my twin nieces from their first visit to the ocean, specifically Tybee Island beach.  They had a blast!  The layout itself was made with a Fancy Pants transparency that I found in my stash.  I then just used some white paint to frame the picture, added a bit of trim, and a word ticket for the sentiment.


Next up is a 6 x 12 layout featuring my three year old (at the time) twin nieces.  They were just showing off one day as we were out shopping.  The camera is from Basically Bare and was heat embossed.  I then added a bit of Stickles for the flash and then covered the center with Glossy Accents.


And lastly, I have a layout that features my nephew sleeping soundly on our drive out to Tybee Island last September.  As soon as we hit the interstate, he was out.  I used a bit of paint to distress the background, added a bit of punchinella, then added on a chipboard gear.  The gear is from Basically Bare and was heat embossed with several colors of WOW embossing powders.

As you can see, the kids provide lots and lots of photo ops for me.  Thanks for stopping in today!


Monday, April 29, 2013

Cards, Cards and More Cards

It's been a while since I've posted projects that I've created for Scrapbook News and Review Magazine, so today I'm going to remedy that and share a few cards. I’ve been on a major card kick lately, which is a good thing for me.  It means that I have a nice stash of cards made that I can just grab when something comes up. 


 The first is an adorable baby shower card that uses a Basically Bare chipboard baby buggy. I covered the chipboard with patterned paper, added a bit of pom-pom, a few crystals, and a mirrored bird.  Completely adorable.


Next up is a fun spring inspired card.  Lots of layered paper, a bit of bakers twine, and a few flowers.  It’s the perfect card for a pick-me-up for a friend.


 Last up is a set of three mini note cards.  To keep things simple, I made all three the same, with the exception of the sentiment.

All of the cards have one thing in common – lots and lots of dimension.  A card has to be lumpy and bumpy, at least in my opinion. J

Monday, April 22, 2013

Mason Jar Pincushion

I'm not much of a sewer.  In fact, me and sewing machines don't get along well at all.  But on occasion,  I do want to add a few stitches to a project.  Somehow, I have managed to collect a small amount of thread, bobbins, and straight pins and need a good way to keep them all organized.

So I decided to make my own storage container/pin cushion.  The best part of this project - it was made completely with items I had on hand.  So what do you need to re-create this project: a Mason jar and lid, white fabric, stuffing, stamps, and markers. That's it!


I started with a 6x6 inch piece of scrap fabric and randomly stamped flowers.  


Next, I colored in the flowers.  I used the following Zig Fabricolor markers: Black, Yellow, Violet, Cobalt Blue, Green, Light Green, and Pink.  And because you know I can't complete a project without some sort of shimmer, I added a bit of sparkle using my Wink of Stella pens in Gl. Clear and Gl. Dark Pink.


 To set the ink and to get the wrinkles out of the fabric, I gave the fabric a quick run under an iron.  To create the pincushion itself, I took a small amount of cotton stuffing and hot glued it to the bottom of the inside lid of a Mason jar.  Then I simply wrapped the fabric over the stuffing and glued the fabric in place on the bottom of the lid.


How cute is this? Now I have the perfect place to stash not only my straight pins when I get the urge to sew something, but the jar itself now holds all my bobbins in one place.


Simple and functional.  What more could I ask for in a project?
Related Posts with Thumbnails