Monday, June 3, 2013

Celebrating Your Graduation

It's that time of year again when thousands of teenagers and young adults will be graduating high school or college and starting a new chapter in their lives.  So what better way to help celebrate the momentous occasion than with a fun card?  


To start, lets gather the supplies we'll need to make this card.  You'll need cardstock, patterned paper, your selected stamps, and the following Zig pens: Art & Graphic Twins, Writer, 2 Way Glue, and a Medium tip Waterbrush.

I used the Waterbrush and the Art &Graphic Twin markers to color the balloons and hedgehog.  I simply touched the end of the Waterbrush to the brush tip of the Art & Graphic Twin markers to pick up the ink, the simply layered the ink onto the stamped image. I then used the fine tip of the brown Art & Graphic Twin marker to create the highlights on the hedgehog.

Then I used my 2 Way Glue Fine Ball Point pen to fill in the hearts on the balloons. I then covered the glue with glitter and set the piece aside to dry.


While the glue was drying, I started on the background of the card. Just a few simply layers of patterned paper with the edges distressed.


Next, I stamped my sentiment with a Black Zig Writer.


How cute is this finished card?!  And did you notice the tiny diploma in its hand?  I just used a scrap piece of  paper, rolled it up, and tied it with a piece of thread.


Congratulations to all of the this years graduates!

Monday, May 27, 2013

Star Frame

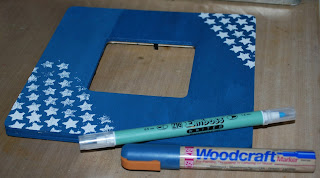
Are you ready for another fun project?   Good, because today I have an altered frame using Basically Bare felt and chipboard and Zig pens and markers. I can already picture adding in an adorable baby picture on this frame.


To start, I painted the entire frame using a Zig Woodcraft marker in Bluebell.  Once the paint was dry, I used a star stencil and my Zig Emboss Writer to make the star shapes.  Then I quickly covered the stars with white embossing powder and then heat embossed the stars.


Next up, I added a couple of felt clouds and a chipboard moon.  The moon was painted with a White Zig Painty FX marker.  Then, when the paint was dry, I covered the moon with a layer of glue from my Zig 2 Way glue Pen and then covered it with clear glitter.  Every project of mine has to have a bit of shimmer and shine.


Next up, I simply added a sentiment sticker and outlined it with a White Zig Chalk Writer.


Simply adorable, but maybe I'm a bit biased :)


Thanks for stopping in today!

Monday, May 20, 2013

Out Of This World

Welcome back!  Today I have a super fun card made using tons of Kuretake inks and Basically Bare chipboard and acrylic.  


Wondering how this card was made?  Well, lets get started and I'll show you.  I started with a 4x6 piece of glossy cardstock.  Using a star stencil and my Zig Emboss Writer, I covered the cardstock with stars.  Then I covered the stars with clear embossing powder and heat embossed the cardstock.


Next, I inked the entire piece of cardstock with Cornflower Blue Kurecolor Ink. The heat embossing on the cardstock will resist the ink, creating a fun background effect.


Next, I splattered a bit of Orange Kurecolor Ink to add another layer of color to the background.


Now, on to the embellishments.  I used my Zig Emboss Writer again to cover the chipboard moon. Then I heat embossed the moon with Wow silver glitter embossing powder. Lastly, I ran it through my Cuttlebug to add a bit more texture.


And with keeping with the same colors, I used my Orange Kurecolor Ink on a couple of acrylic stars.


Now to layer everything together.  I simply punched a couple of holes in the moon and then attached it to the card with a bit sheer white ribbon.  Next I adhered the stars, and then added a few sentiment stickers.


Thanks for stopping in today!

Monday, May 13, 2013

Bright and Colorful

Hmmm…several posts in a row…I might just be getting back into a regular blogging rhythm again J  Today I have a few more projects from the October issue of Scrapbook News and Review Magazine.


First up is a fun tea cup shaped card.  And it was super simple to make.  Layers of patterned paper, a bit of lace, felt wings and a canvas heart from Basically Bare.  The heart was heat embossed with WOW embossing powders and the wings were colored with Glimmer Mist.


Next up is a card perfect for that special someone in your life.  I started with black cardstock for the background then added a bit of musical inspried patterned paper.  Then a bit of May Arts ribbon that was inked blue and flower from Petaloo that was also inked blue.  Lastly, I cut out a piece of patterned paper in the shape of a heart and inked the edges a bright pink so it would contrast with the blue. 


And lastly, I have an adorable tag. Layers and layers of patterned paper.  Lots of stamping on the background.  And the focal point of the tag is a stamped imaged from Queen Kat Designs that is colored with Prismacolor pencils.  With colors from the Spring spectrum, it would make the perfect addition to a gift.

Thanks for stopping in today!

Monday, May 6, 2013

Family Fun

Welcome back!  Today I have three fun layouts that feature my my adorable nieces and nephew.  All three layouts were in the October issue of Scrapbook News and Review Magazine.


First up is a layout that features my twin nieces from their first visit to the ocean, specifically Tybee Island beach.  They had a blast!  The layout itself was made with a Fancy Pants transparency that I found in my stash.  I then just used some white paint to frame the picture, added a bit of trim, and a word ticket for the sentiment.


Next up is a 6 x 12 layout featuring my three year old (at the time) twin nieces.  They were just showing off one day as we were out shopping.  The camera is from Basically Bare and was heat embossed.  I then added a bit of Stickles for the flash and then covered the center with Glossy Accents.


And lastly, I have a layout that features my nephew sleeping soundly on our drive out to Tybee Island last September.  As soon as we hit the interstate, he was out.  I used a bit of paint to distress the background, added a bit of punchinella, then added on a chipboard gear.  The gear is from Basically Bare and was heat embossed with several colors of WOW embossing powders.

As you can see, the kids provide lots and lots of photo ops for me.  Thanks for stopping in today!


Monday, April 29, 2013

Cards, Cards and More Cards

It's been a while since I've posted projects that I've created for Scrapbook News and Review Magazine, so today I'm going to remedy that and share a few cards. I’ve been on a major card kick lately, which is a good thing for me.  It means that I have a nice stash of cards made that I can just grab when something comes up. 


 The first is an adorable baby shower card that uses a Basically Bare chipboard baby buggy. I covered the chipboard with patterned paper, added a bit of pom-pom, a few crystals, and a mirrored bird.  Completely adorable.


Next up is a fun spring inspired card.  Lots of layered paper, a bit of bakers twine, and a few flowers.  It’s the perfect card for a pick-me-up for a friend.


 Last up is a set of three mini note cards.  To keep things simple, I made all three the same, with the exception of the sentiment.

All of the cards have one thing in common – lots and lots of dimension.  A card has to be lumpy and bumpy, at least in my opinion. J

Monday, April 22, 2013

Mason Jar Pincushion

I'm not much of a sewer.  In fact, me and sewing machines don't get along well at all.  But on occasion,  I do want to add a few stitches to a project.  Somehow, I have managed to collect a small amount of thread, bobbins, and straight pins and need a good way to keep them all organized.

So I decided to make my own storage container/pin cushion.  The best part of this project - it was made completely with items I had on hand.  So what do you need to re-create this project: a Mason jar and lid, white fabric, stuffing, stamps, and markers. That's it!


I started with a 6x6 inch piece of scrap fabric and randomly stamped flowers.  


Next, I colored in the flowers.  I used the following Zig Fabricolor markers: Black, Yellow, Violet, Cobalt Blue, Green, Light Green, and Pink.  And because you know I can't complete a project without some sort of shimmer, I added a bit of sparkle using my Wink of Stella pens in Gl. Clear and Gl. Dark Pink.


 To set the ink and to get the wrinkles out of the fabric, I gave the fabric a quick run under an iron.  To create the pincushion itself, I took a small amount of cotton stuffing and hot glued it to the bottom of the inside lid of a Mason jar.  Then I simply wrapped the fabric over the stuffing and glued the fabric in place on the bottom of the lid.


How cute is this? Now I have the perfect place to stash not only my straight pins when I get the urge to sew something, but the jar itself now holds all my bobbins in one place.


Simple and functional.  What more could I ask for in a project?

Monday, April 15, 2013

Spring Cards

Welcome back!  Today I have two cards, both colored using Zig markers.  On my last trip to the craft store I found both of these stamps in the clearance bin.  They looked so sad and lonely, so of course they had to come home with me. :)

Sunflowers is the name of the game on this first card.  The petals were colored with a Zig Brushables in Pure Yellow and the leaves were colored with a Brushables in Spring Green. The center of the flowers were colored using a waterbrush and Fabricolor pen in Black. I simply brushed the tip of the waterbrush against the pen nib and then blended the color on the cardstock.  Lastly, I colored the ladybug with a Zig Writer in Pure Red, then used my Wink of Stella in Gl. Clear to add a bit of shimmer.


Next up is an adorable pastel colored card, also colored using nothing but Zig pens.  The tulip and stems were colored with a Zig Brushables in Pure Yellow and the leaves were colored with a Brushables in Spring Green. The dress was colored with an Art & Graphic Twin marker in pink and a waterbrush.  I used the same technique as above to achieve the watercolor effect, touching the waterbrush to the pen nib and then applying the color to the cardstock.

Her hair was colored using a Brushables in Pure Yellow and a Fabricolor pen in Brown, along with waterbrush.  I added the base color of yellow to her hair, the added highlights of the brown.  Lastly, the flowers in her hair were colored with a Fabricolor pen in Cobalt Blue, then highlighted with my Wink of Stella pen.  Love, love, love the Wink of Stella pens!  Subtle glimmer without being over the top.


I hope you've enjoyed my cards today.  Thanks for stopping in!

Tuesday, April 9, 2013

Steampunk Decor

Seems like forever since I've had a change to actually sit down and work on a project, or even type up a blog post.  Well, I had a fun scrappy day with friends at my house this past Sunday.  And I was finally inspired to complete a project.


My inspiration for this project started with the "I'm 2 Pretty To Word" charm.  When I saw it in the store, I had no idea what I was going to do with it, but I know it was going home with me.  Then I noticed a bare wooden bird sitting on the shelf and inspiration struck.

So you're probably asking how I put this little guy together?  Ok, so let's get started!  First things first, I used my Zig Paint FX pen in Black around the edges.  Once that was dry, I used a Zig Woodcraft marker in Antique Metallic to add some highlights.  Then I added strips of a paper from a dictionary and adhered it to the bird with gel medium and set it aside to dry.  Then, using my Zig Art and Graphic Twin in Cornflour Blue, Brushables in Pure Pink, and Waterbrush, I added color to the book pages.  I simply brushed the waterbrush against the marker nibs and applied the color to the pages until I was happy with the outcome.


Next up, I created the wings.  I took small strips of cardstock and covered them with regular kitchen foil.  Then I ran the pieces through my Cuttlebug to add some texture.  Lastly, I added a bit of color using my Zig Painty FX pen in LT Blue.  Keeping with the steampunk theme, I added a few watch mechanisms to the bottom of the wings and to the tail.  Of course, I couldn't resist adding a flower. :)


For the eye, I again used a watch piece that I outlined with my Painty FX pen.   The hat is a Basically Bare chipboard die cut.  All I did was use my Zig Chalk Writer in White to add a few details to the edges.  Since it was already a sold black chipboard piece, it didn't require a lot of fuss.

Wednesday, March 13, 2013

Easter Treat Bags

We're coming up on a fun day filled with egg hunts, chocolate bunnies, and sunrise services.  So I figured what better project to make than something Easter themed. And just between you and me, these were super quick to make.  These little bags are perfect for giving out little pieces of candy or maybe even filling with homemade treats.


How simple were these to make?  They only involve two steps - first, stamp the image you want, and second, color the image.  Easy peasy. And you don't even need a ton of supplies for this either.  I used two different stamps and several different colors of markers.

Supplies

Stamps: Stampers Anonymous, Stampendous

Markers: Zig Writer in Black; Zig Brushables in Pure Pink, Lunar Lavender, Pure Yellow, and Spring Green; Zig Art & Graphic Twin in Cornflour Blue; Zig Calligraphy in Silver, and Zig Medium Tip Waterbrush

Small brown paper bags

Monday, February 25, 2013

Imagine Bookmark

I've been slowly but surely getting myself back on track with my postings.  And today I have a really fun bookmark created for World Book Day, which is on March 7.  I love to curl up with a good book, whether it be a real paper and ink book or the digital version (although I'm partial to the paper and ink kind myself).  Plus, you can't use this awesome bookmark with a digital book. :)

I used so many fun products on this tag.  Starting with the background, which was misted with Dylusions inks.  Then I used a Crafter's Workshop stencil with Art Anthology Sorbets to create a fun textured design.  Once that was dry, I layered on a bit of punchinella, a stick pin, and a Basically Bare felt cloud, which was covered with Stickles and a bit of ink from a Zig Art and Graphic Twin marker in Cornflour blue.


Then I used a Zig Emboss Writer on the chipboard letters then heat embossed them with WOW embossing powders.  LOVE the vibrant yellow!


The sun is a stamp from Queen Kat Designs, which was colored with Zig Brushables in Pure Yellow, Zig Art and Graphic Twin in TUT-80, Zig Wink of Stella in GL. Clear, and lastly a Zig Photo Signature pen in Red.

Friday, February 22, 2013

Party Animal

Jamie here with you again on a wonderful Friday.  Today I have a fun card to share that uses a new stamp called Dobs by stamp designer Che Gilson from Queen Kat Designs. This was such a fun stamp to work with.  I knew immediately what I was going to make.


I started by coloring the image with my Prismacolor pencils (as usual).  Then I started on the card background.  I layered my papers, added a bit of burlap ribbon, a chipboard arrow, and the sentiment.  Quick and simple, my favorite type of card. :)


And it is with a sad heart that I have to say this will be my last post as part of the Design Team for Queen Kat Designs.  I have enjoyed my time with the company and with the gals on the team, but family life and personal issues have taken over any spare time I've had.  I will truly miss working with the company.

Friday, February 15, 2013

You Are Beautiful

Welcome back to another fun Friday!  Today I've made a tag using the Celtic Fairy stamp by stamp designer Kristie Silva from Queen Kat Designs.  I simply love her facial expression.  So let's see how this tag was made.


First, I misted the background using several different colors of Dylusions inks.  Then, using a stencil and gold dimensional paint, I created the raised portion.  Then I simply layered on the punchinella, baker's twine, butterfly, and the sentiment.


The image itself was colored with Prismacolor pencils and then fussy cut.  Then I simply adhered it to the tag itself.

Friday, February 8, 2013

Hugs

Today I have a stamp called Yeti by stamp designer Kristie Silva from Queen Kat Designs.  Is he not the cutest thing you've ever seen?  And hugging his little toy made it the perfect stamp for a Valentine's Day card.


I started by coloring the image with my Prismacolor pencils.  Next I inked the edges of the cardstock.  The card background was made by layering different patterned papers, adding a bit of baker's twine, a few black buttons, and a felt key.


It all comes together to make one super cute card perfect for that loved one.

Monday, February 4, 2013

Heart Plate

I'm gearing up for a fun Valentine's Day, and today I have a fun project with just that theme in mind.  Oh, and did I mention quick and easy too?  

Let's start with our supplies.  I used  red, pink, and black Zig Painty FX markers and a red Zig Photo Signature pen.  The plate is a plastic plate I found at my local dollar store.  You never know what little gems you'll find there, plus they only cost $1, so you can't beat the price. :)


So I mentioned this was a quick and easy project.  All I did was alternate drawing hearts with the red and pink paint pens.  Once the paint was dry (which only takes a few seconds), I added highlights with the black paint pen and the photo pen.


The end results yield an adorable plate for Valentine's Day.  To protect the paint, I would recommend giving the plate a quick spray with an acrylic sealant.  Also, neither the paint nor the acrylic sealant are food safe, so any food placed on the plate needs to be in a wrapper or placed on top of a napkin and not directly on the plate itself.

Thanks for stopping in today!

Friday, February 1, 2013

Imagine

Jamie here with you on this wonderful Friday morning.  Can you believe we're already into the second month of the year?  So today I have a fun stamp from Queen Kat Designs to share, Moon Girl by stamp designer Laura Macy.

This is such an adorable image!  I had the image colored and the card made in about 30 minutes.  I love it when a stamped image "speaks" to me.  :) But it really does make the creative process so much easier when it happens that way.


The image was fully colored with Prismacolor pencils, then simply mounted on cardstock and layered on the card.  A simple acrylic star was added to completed the card.  Quick and simple, and totally adorable!


Thanks for stopping in today!
Related Posts with Thumbnails